How to Clean Grill Grates: The Science of Buildup, Heat, and Restoration
How to Clean Grill Grates: The Science of Buildup, Heat, and Restoration
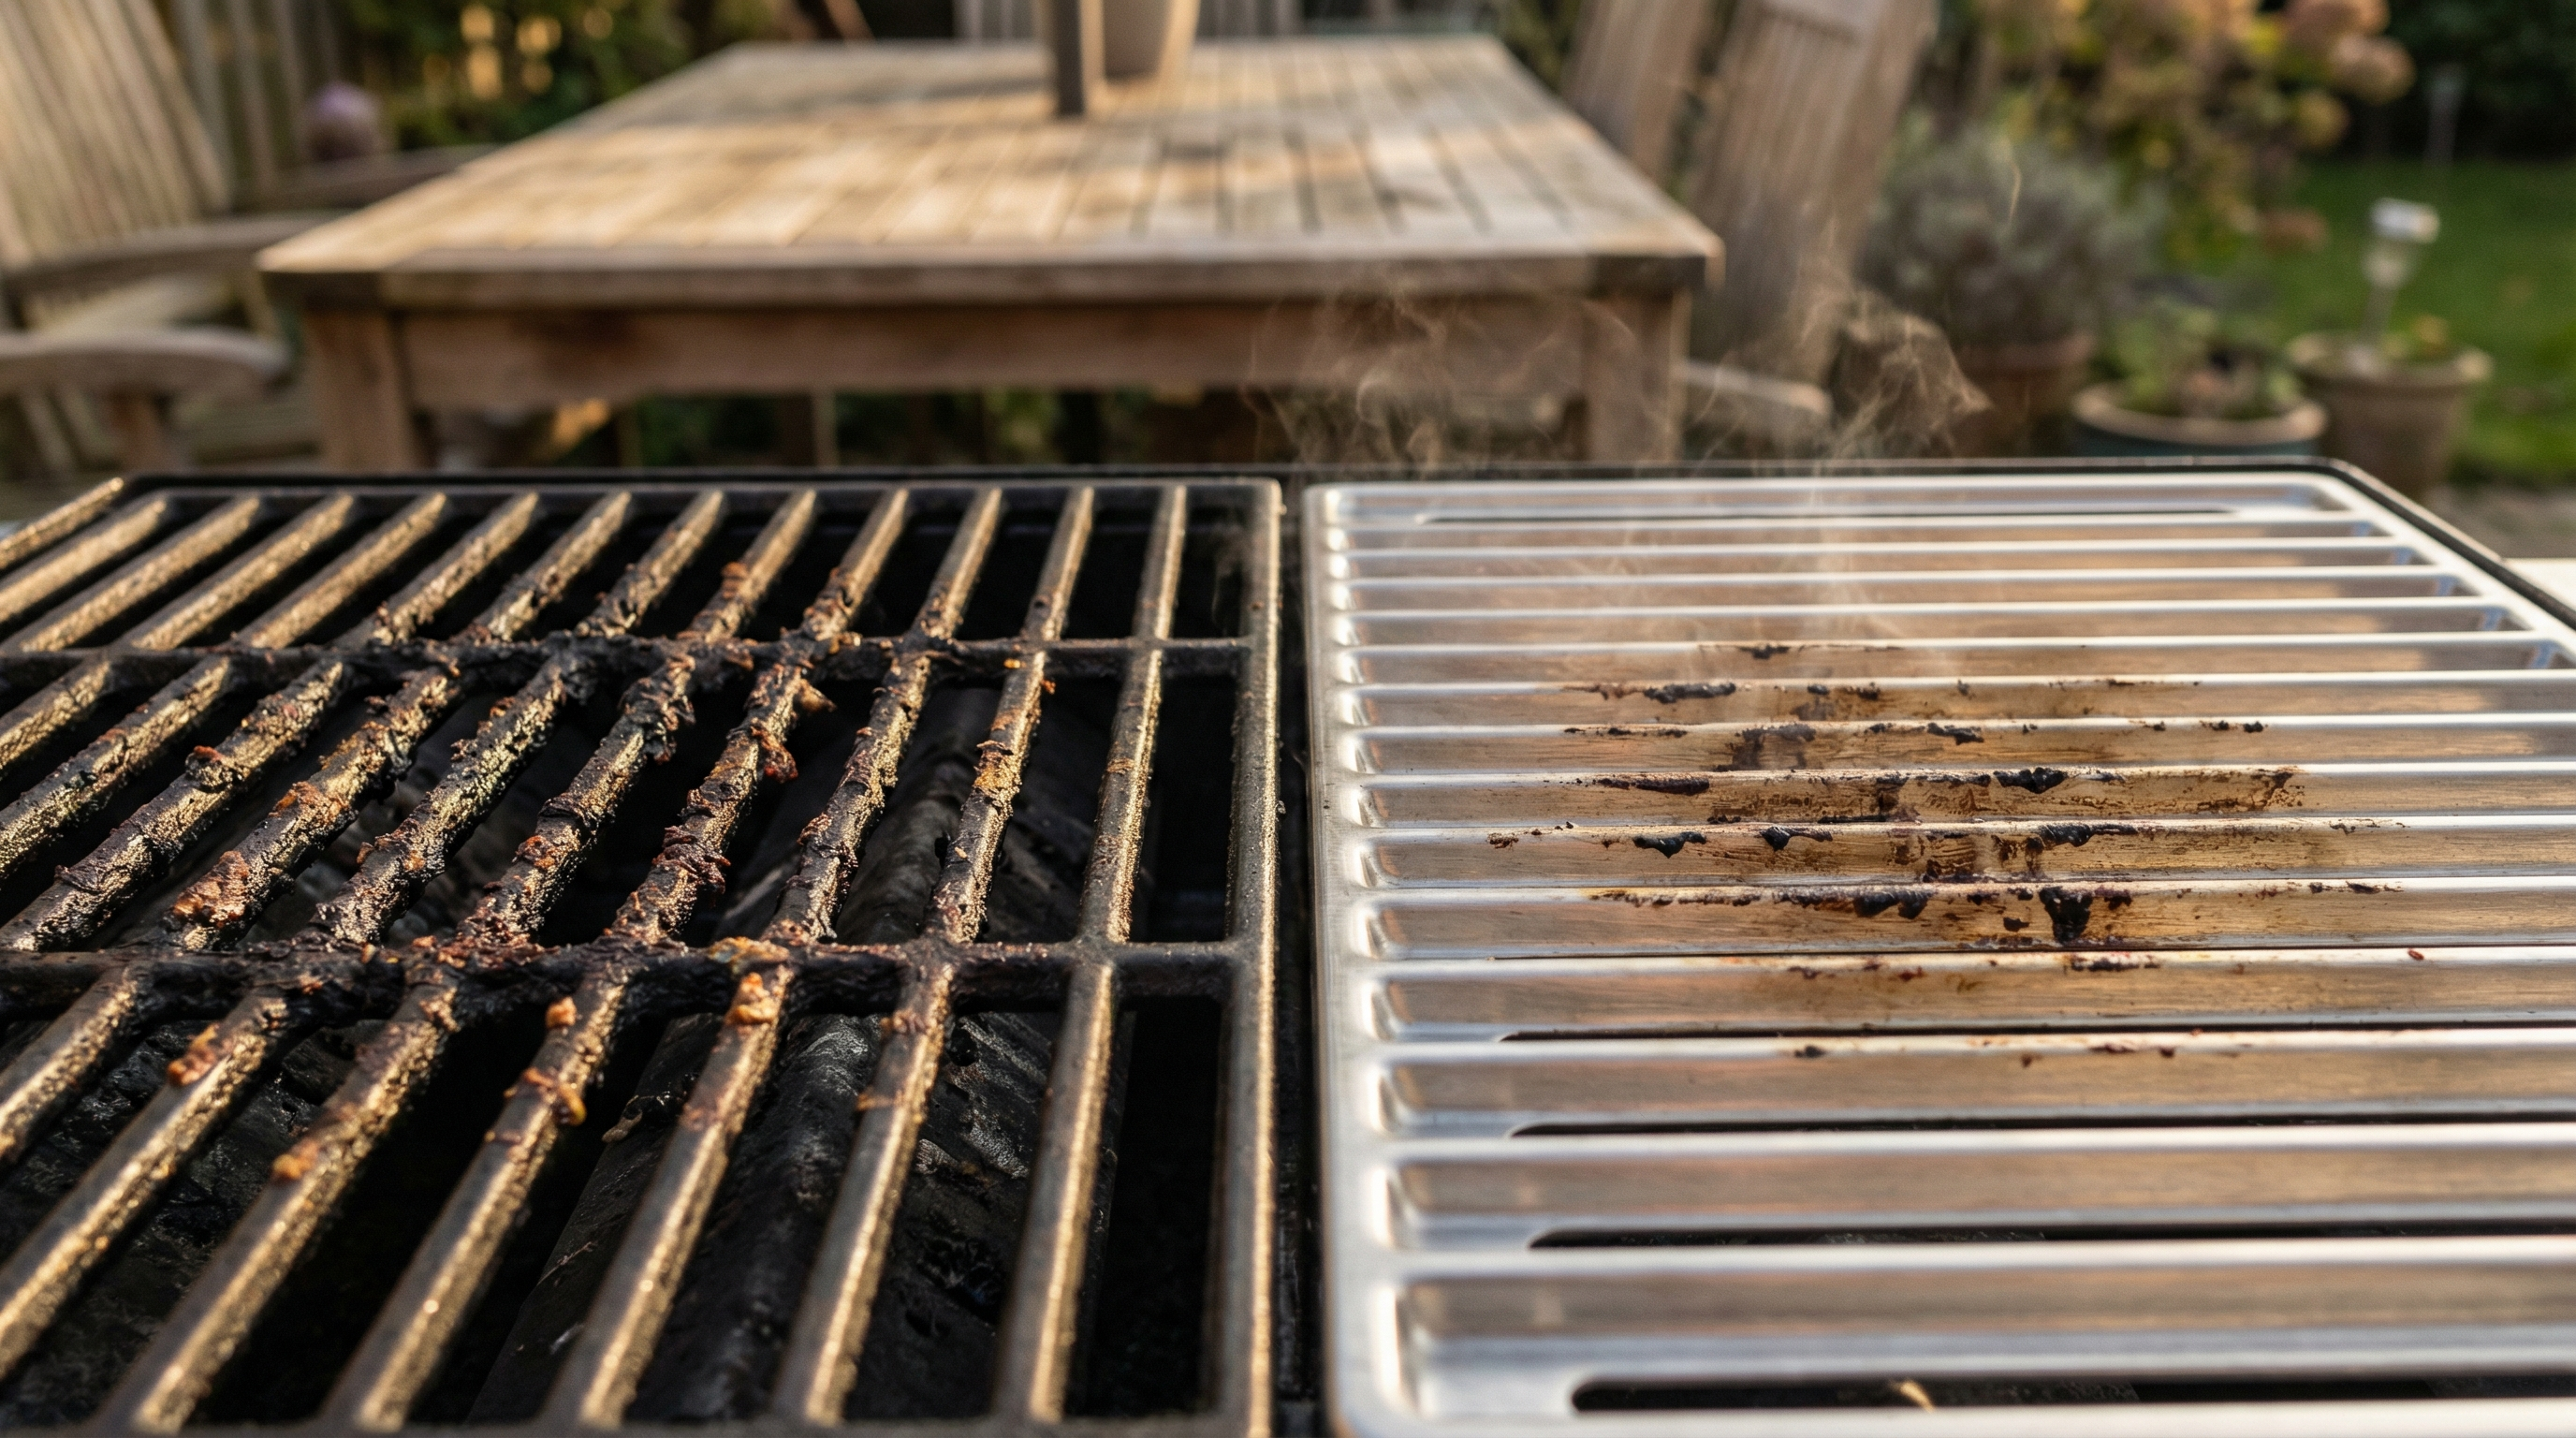
Every griller knows the black crust that accumulates on grates over time. Most treat cleaning as a chore — a quick wire brush scrub before the next cook. But that buildup is not random grime. It is a polymerized carbon matrix bonded to the metal surface through specific chemical reactions, and understanding those reactions tells you exactly how to remove it efficiently without damaging your grates.
This guide covers the chemistry of grate buildup, why different grate materials behave differently, and the science behind every major cleaning method — so you can pick the right approach for your grill and stop wasting effort on techniques that do not work.
What Grate Buildup Actually Is: The Chemistry
When you grill, three types of material accumulate on the grates:
- Carbonized food residue — Proteins and sugars from meat, marinades, and sauces undergo the Maillard reaction and pyrolysis at grate-contact temperatures (400–700°F). The organic molecules break down and recombine into complex carbon structures. This is the hard, black crust that bonds directly to the metal.
- Polymerized cooking oils — Fats and oils that drip onto hot grates undergo oxidative polymerization. The unsaturated fatty acid chains cross-link with each other and with the metal surface oxide layer, forming a hard, lacquer-like coating. This is chemically identical to the seasoning on a cast iron skillet — except on grill grates it builds up unevenly and traps food particles.
- Mineral ash deposits — Calcium, phosphorus, and other minerals from meat and bone leave inorganic residues that do not burn off. These white or gray deposits are especially common on grates used frequently for bone-in cuts.
The key insight: most grate buildup is covalently bonded to the metal surface through the polymerized oil layer. This is why a damp cloth does nothing — you are not dealing with loose dirt. You are dealing with molecular bonds that require either extreme heat, chemical attack, or mechanical abrasion to break.
Why Grate Material Matters
The three common grate materials — cast iron, stainless steel, and porcelain-coated steel — have fundamentally different surface chemistries that dictate which cleaning methods are safe and effective.
Cast Iron Grates
Cast iron is porous at the microscopic level. The surface contains tiny voids and grain boundaries where polymerized oil penetrates and anchors. This porosity is what makes cast iron excellent at developing seasoning — and what makes aggressive cleaning risky. Strip the seasoning and you expose raw iron to moisture, which forms iron oxide (rust) within hours in humid environments.
Cast iron cleaning rule: Remove the carbonized buildup but preserve the polymerized oil base layer. The goal is a smooth, dark surface — not bare gray metal.
Stainless Steel Grates
Stainless steel forms a self-healing chromium oxide (Cr₂O₃) passive layer on its surface. This layer is only nanometers thick but is extremely resistant to corrosion. Buildup adheres to this oxide layer rather than penetrating the metal itself, which means aggressive cleaning is safer — the passive layer regenerates almost immediately when exposed to oxygen.
Stainless steel cleaning rule: You can use more aggressive methods without permanent damage. Avoid chloride-containing cleaners (bleach) that can pit the passive layer, and always scrub with the grain of the metal, not against it.
Porcelain-Coated Grates
Porcelain enamel is a glass-like coating fused to the underlying steel at temperatures above 1,400°F. It creates a non-porous, chemically inert surface that resists buildup adhesion. However, porcelain is brittle. Mechanical impact or aggressive wire brushing can chip the enamel, exposing the underlying steel to rapid corrosion.
Porcelain cleaning rule: Never use metal wire brushes or metal scrapers. The enamel cannot be repaired once chipped. Use nylon brushes, wooden scrapers, or chemical methods only.
Heat Cleaning: Pyrolysis in Practice
The most effective first-line cleaning method for any grill grate is high-heat pyrolysis — burning off the organic buildup by running the grill at maximum temperature with the lid closed.
Here is why it works: the carbonized residue on your grates is mostly carbon, hydrogen, and oxygen. At temperatures above 900°F, these organic compounds undergo complete thermal decomposition. The carbon oxidizes to CO₂, the hydrogen to water vapor, and the residue turns to fine white ash that brushes off with minimal effort.
The process:
- Close all vents except one intake and the exhaust (charcoal), or turn all burners to maximum (gas). For pellet grills, set to max temperature — though most pellet grills cannot reach true pyrolysis temperatures.
- Close the lid and let the grill run for 15–20 minutes. The interior temperature needs to exceed 800°F for effective pyrolysis. You will see smoke as the organic material decomposes.
- When the smoke stops, the burn-off is complete. Open the lid, let the grates cool to handling temperature, and brush off the white ash residue with a grill brush.
This method works because you are using the same chemistry that created the problem — thermal decomposition — but at a higher temperature that completes the reaction. The original Maillard products formed at 300–500°F; you are now pushing them past 800°F where they cannot maintain their molecular structure.
Limitation: Pyrolysis does not fully remove the polymerized oil layer because the cross-linked polymer chains require temperatures above 1,000°F for complete decomposition. The burn-off removes the loose carbon crust but leaves the seasoning intact — which is actually ideal for cast iron grates.
Chemical Cleaning: Breaking Molecular Bonds
When heat alone is insufficient — typically for heavily neglected grates or grates with mineral deposits — chemical methods attack the bonds directly.
Alkaline Cleaners (Oven Cleaner, Lye)
Sodium hydroxide (NaOH), the active ingredient in most oven cleaners, is the most effective chemical for grate cleaning. It works through saponification: the hydroxide ions break the ester bonds in polymerized oils, converting them into water-soluble soap molecules and glycerol. The carbonized residue, no longer anchored by the oil matrix, flakes off.
Application: Spray the grates thoroughly with oven cleaner, seal in a garbage bag to prevent evaporation, and wait 12–24 hours. The longer the contact time, the more complete the saponification reaction. Rinse thoroughly with water afterward.
Warning for cast iron: Lye strips all polymerized oil, including the seasoning layer. After lye cleaning, cast iron grates must be completely re-seasoned before use, or they will rust immediately.
Safe for: Stainless steel (no damage), cast iron (strips seasoning — re-season after), porcelain (safe if enamel is intact).
Acid Cleaners (Vinegar, Citric Acid)
Acidic solutions dissolve mineral deposits that alkaline cleaners cannot touch. The acetic acid in vinegar (CH₃COOH) reacts with calcium carbonate and calcium phosphate deposits:
CaCO₃ + 2CH₃COOH → Ca(CH₃COO)₂ + H₂O + CO₂
The calcium acetate product is water-soluble, and the fizzing CO₂ provides mechanical lifting action. A 50/50 vinegar-water soak for 30–60 minutes handles most mineral buildup.
Warning: Never use vinegar on cast iron — the acid attacks the iron itself, causing pitting. And never mix acidic and alkaline cleaners (vinegar + oven cleaner) — they neutralize each other, and certain combinations produce toxic fumes.
Baking Soda Paste
Sodium bicarbonate (NaHCO₃) is a mild alkali that provides both chemical cleaning action (weak saponification) and mechanical abrasion (the crystals act as a gentle abrasive). Mixed with water to a thick paste and applied to grates for 20–30 minutes, it loosens moderate buildup without the aggressiveness of lye.
This is the safest chemical option for all grate types, including porcelain. It will not strip cast iron seasoning unless scrubbed aggressively, and it will not damage stainless steel or enamel.
Mechanical Cleaning: Abrasion Methods Ranked
Mechanical cleaning removes buildup through physical force. The effectiveness and risk depend on the hardness of the abrasive relative to the grate material.
Wire Grill Brushes
Brass-bristle brushes are softer than steel and safe for all grate types including porcelain. Stainless steel bristle brushes are harder and more aggressive — effective on cast iron and stainless grates but will chip porcelain enamel. The critical safety issue: loose wire bristles can break off, stick to the grate, and end up in food. This is a documented medical emergency risk — swallowed wire bristles have caused esophageal and intestinal perforations requiring surgery.
If you use a wire brush, inspect the grate carefully after brushing and replace the brush when bristles become loose. Or switch to a bristle-free alternative.
Bristle-Free Scrapers
Wooden paddle scrapers, coil-spring brushes, and nylon-bristle brushes eliminate the bristle ingestion risk. Wooden scrapers conform to the grate rod shape over time (the heat softens the wood, which wears to match the grate profile). They are less aggressive than wire brushes but safer for all grate types.
Aluminum Foil Ball
A crumpled ball of aluminum foil held with tongs makes an effective improvised scrubber. Aluminum is softer than steel and iron, so it will not scratch cast iron or stainless grates. It conforms to the grate rod shape and provides surprisingly good abrasion. This is the best emergency cleaning method when you have no brush available.
Onion Half Method
Cutting an onion in half and rubbing it on hot grates is a popular technique with actual science behind it. The onion releases organic acids (primarily oxalic acid) and water onto the hot surface. The acids provide mild chemical cleaning, the water creates steam that loosens carbonized residue, and the onion itself provides gentle mechanical scrubbing. The sulfur compounds in onion also have mild antimicrobial properties.
This method will not remove heavy buildup, but it is effective for pre-cook cleaning of lightly soiled grates and leaves no chemical residue.
The Optimal Cleaning Protocol by Grate Type
Cast Iron: The Seasoning-Preservation Method
- After every cook: While grates are still hot (300–400°F), brush with a brass-bristle brush or wooden scraper to remove food residue. The heat keeps the buildup soft and easy to remove.
- Monthly deep clean: Run the burn-off cycle (max heat, lid closed, 15 minutes). Brush off ash. Apply a thin coat of high-smoke-point oil (flaxseed, avocado) with a paper towel held by tongs. Let the grill cool with the oil coating — this maintains the seasoning.
- Annual restoration: If buildup is excessive, remove grates and soak in hot water with dish soap for 1 hour (the surfactants lift loose debris without stripping seasoning). Scrub with a stiff nylon brush, rinse, dry immediately over a burner, and apply two coats of oil seasoning at 450°F for 1 hour each.
Stainless Steel: The Aggressive Method
- After every cook: Burn-off cycle (max heat, 10 minutes), then scrub with a stainless steel bristle brush while grates are hot.
- Monthly: Remove grates, spray with oven cleaner, bag for 12 hours, rinse, and scrub with a Scotch-Brite pad along the grain. The chromium oxide layer regenerates within minutes of rinsing.
- For mineral deposits: Soak in 50/50 vinegar-water for 30 minutes after the alkaline clean (rinse between the two — never mix them).
Porcelain-Coated: The Gentle Method
- After every cook: Let grates cool to warm (not hot — thermal shock can crack enamel). Scrub with a nylon-bristle brush or wooden scraper. Never use metal tools.
- Monthly: Remove grates, apply baking soda paste, wait 30 minutes, scrub with a nylon brush or soft sponge. Rinse thoroughly.
- For stubborn buildup: Soak in hot water with dish soap for 2 hours, then baking soda paste. If that fails, oven cleaner is safe on intact porcelain but inspect for chips first — any exposed steel under the enamel will corrode rapidly if alkaline cleaner contacts it.
Common Mistakes That Damage Grates
- Spraying cold water on hot grates: The thermal shock can warp stainless steel grates and crack porcelain enamel. Always let grates cool before applying liquids, or use steam (a wet towel held with tongs over hot grates) for gradual cooling.
- Leaving cast iron grates wet: Iron rusts within 1–2 hours in humid conditions once moisture is present. Always dry cast iron grates over heat immediately after any water contact, then apply a thin oil coat.
- Using a dishwasher: The prolonged water exposure and alkaline dishwasher detergent will strip cast iron seasoning completely and cause flash rust. Stainless steel is dishwasher-safe in theory, but the grate size usually makes it impractical.
- Wire brushing porcelain: A single aggressive session with a steel wire brush can chip enamel in multiple spots, each chip becoming a rust initiation site. Once the enamel is compromised, the grate's lifespan drops from years to months.
When to Replace Instead of Clean
Grates have finite lifespans regardless of cleaning practices:
- Cast iron: 5–15 years with proper seasoning maintenance. Replace when pitting becomes deep enough to trap food or when warping prevents even contact with the food surface.
- Stainless steel: 5–10 years. Replace when the rod diameter has noticeably thinned from corrosion, or when warping creates an uneven cooking surface.
- Porcelain-coated: 2–5 years. Replace when enamel chips expose more than 10–15% of the underlying steel — at that point, rust prevention becomes impossible.
A clean grate is a better cooking surface — food sticks less, heat transfer is more even, and flavors stay true. The 5 minutes of post-cook cleaning that most grillers skip is the single highest-return maintenance habit you can build.
Frequently Asked Questions
Should I clean grill grates after every use?
Yes — a quick brush while the grates are still hot takes 2–3 minutes and prevents buildup from polymerizing into a hard layer. The longer residue sits on hot metal, the stronger the carbon-metal bond becomes. Cleaning hot grates immediately after cooking is 5× easier than cleaning cold, neglected grates.
Is it safe to use oven cleaner on grill grates?
Yes for stainless steel and intact porcelain grates. The sodium hydroxide in oven cleaner is the most effective chemical for removing polymerized oil buildup. For cast iron, it works but strips all seasoning — you must fully re-season afterward. Always rinse thoroughly and never use oven cleaner on grates that have chipped porcelain exposing raw steel.
Can I put grill grates in a self-cleaning oven?
Technically yes — a self-cleaning oven reaches 880–950°F, which pyrolyzes all organic buildup. However, this can warp thin grates, crack porcelain enamel from thermal stress, and will completely strip cast iron seasoning. It works as a last resort for stainless steel grates but is not recommended as a regular cleaning method.
Why does food stick to clean grill grates?
Protein adhesion occurs when meat contacts metal below 350°F — the proteins form chemical bonds with the metal oxide surface. Prevention: preheat grates to 400°F+ before cooking (the high temperature carbonizes the contact layer instantly, preventing bonding), and oil the food rather than the grates to create a release layer.
Are wire grill brushes dangerous?
Wire bristles can break off, embed in food, and cause serious internal injuries if swallowed. This is a documented medical risk. Safer alternatives include brass-bristle brushes (softer, less likely to break), wooden scrapers, coil-spring brushes, and crumpled aluminum foil. If using wire brushes, inspect grates after brushing and replace the brush when bristles loosen.
More Expert Guides
Steak Doneness Temperature Guide: The Science of Every Level from Rare to Well Done
Every degree matters. This science-backed guide covers the exact internal temperatures for every steak doneness level, why each temperature produces a different texture, and how to nail your target every time.
14 min readDirect vs Indirect Heat Grilling: The Science of Two-Zone Cooking
Direct heat sears. Indirect heat roasts. Understanding the physics of each — and when to combine them — is the foundation of every great grilling technique.
14 min readResting Meat After Cooking: The Science of Why It Makes Every Steak Juicier
Resting meat after cooking is not optional — it is physics. Here is exactly what happens inside the steak during those crucial minutes and how long to rest every cut.