Grilling Temperature Zones: The Science of Heat Management
Every backyard cook has experienced it: a steak with a charred exterior and a raw center, or chicken that looks perfect on the outside but reads 140°F at the bone. These failures share one root cause—a misunderstanding of grilling temperature zones. Heat management isn't a matter of intuition; it's applied thermodynamics. Once you understand how thermal energy transfers across your grill grate, you gain precise control over browning, rendering, collagen conversion, and moisture retention.
I've spent years measuring grill surface temperatures with infrared thermography and embedded thermocouples, and the data consistently tells the same story: the cooks who produce restaurant-quality results aren't using better grills—they're using better zone strategy. This guide breaks down the science, the setups, and the practical applications so you can do the same.
Why Grilling Temperature Zones Matter
A single-temperature grill is a blunt instrument. When every square inch of your cooking surface sits at the same heat level, you're forced into a compromise: either the exterior cooks too fast or the interior cooks too slowly. Temperature zones eliminate that compromise by giving you multiple thermal environments on one grill.
Consider what happens when you sear a 1.5-inch ribeye over uniform high heat. The surface reaches Maillard reaction temperatures (above 280°F) almost immediately, but thermal conductivity through raw beef is slow—roughly 0.45 W/(m·K). By the time the center hits 130°F for medium-rare, the outer 8–10mm has blown past 160°F into well-done territory. That gray band of overcooked meat represents lost moisture and diminished flavor.
With properly configured grilling temperature zones, you can bring the center to within 10–15°F of your target on the cooler side, then finish with a 60–90 second sear over direct heat. The result: edge-to-edge color with a deeply developed crust. This isn't opinion—it's physics.
Zones also provide a safety buffer. Flare-ups from rendering fat can push surface temperatures above 800°F. Without a cool zone to move food to, you're one drip away from a burnt offering. Professional pitmasters always maintain a "safe zone"—and you should too.
The Science of Direct vs. Indirect Heat
Understanding grilling temperature zones requires understanding the three mechanisms of heat transfer at play on your grill: conduction, convection, and radiation.
Direct heat (food positioned directly over the fuel source) delivers energy through all three mechanisms simultaneously. The grill grates conduct heat into the food at contact points (creating sear marks), radiant infrared energy from the coals or burner heats the entire exposed surface, and rising hot air provides convective heating. Combined, direct heat can deliver surface temperatures of 500–700°F, making it ideal for Maillard browning and caramelization.
Indirect heat (food positioned away from the fuel source) relies primarily on convection. Hot air circulates around the food in a pattern similar to an oven. Surface temperatures in the indirect zone typically range from 225°F to 375°F depending on configuration. This gentler environment excels at collagen conversion, slow rendering of intramuscular fat, and even cooking of thick proteins.
The thermal gradient between these zones is what gives you control. Think of your grill as having a spectrum: the hottest point directly over fuel, progressively cooler temperatures as you move laterally, and the coolest point furthest from any heat source. Mastering grilling temperature zones means learning to use that entire spectrum.
The Two-Zone Setup: Your Foundation
The two-zone configuration is the most fundamental and versatile setup. It divides your grill into two regions: a hot zone (direct heat) and a cool zone (indirect heat).
On a Charcoal Grill
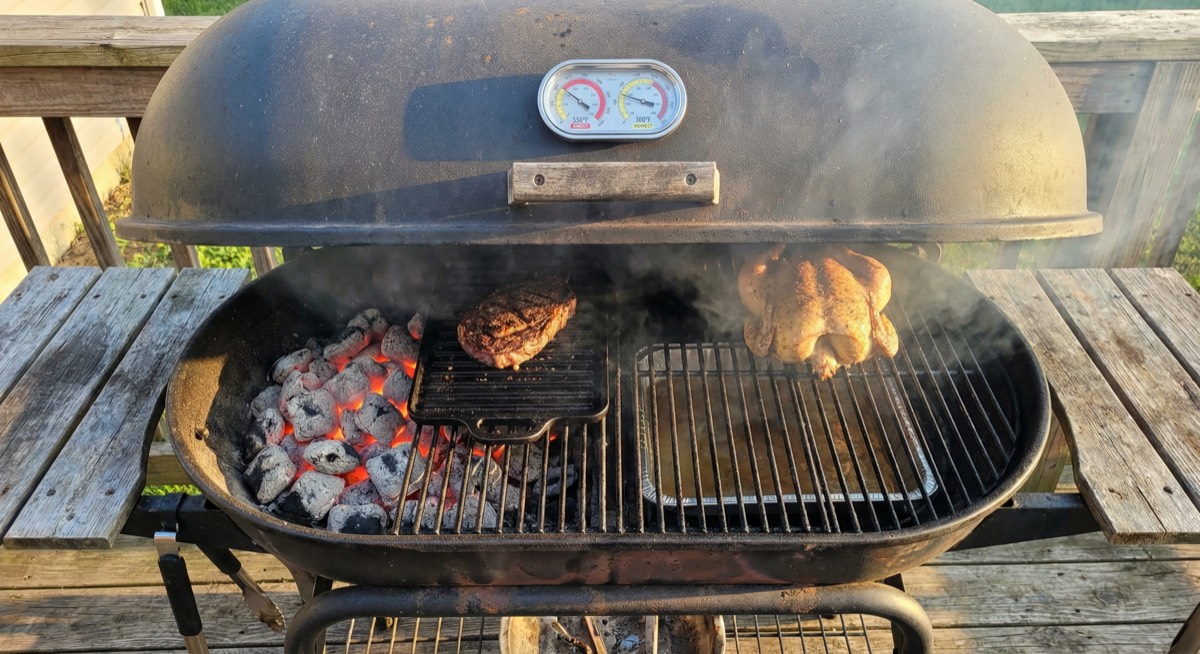
Bank all lit coals to one side of the charcoal grate. The coal side becomes your direct zone (450–650°F at grate level), while the empty side becomes your indirect zone (275–350°F with the lid closed). For a standard 22-inch kettle, this gives you roughly equal cooking areas.
On a Gas Grill
Light the burners on one side and leave the opposite burners off. A three-burner gas grill works well—light the left and center burners on medium-high, leave the right burner off. The unlit side becomes your indirect zone.
When to Use Two-Zone
This setup handles 80% of grilling scenarios. It's ideal for:
- Steaks, chops, and burgers (sear direct, finish indirect or vice versa)
- Bone-in chicken pieces (start indirect to cook through, finish direct for crispy skin)
- Vegetables that need some char but also time to soften
- Any situation where you need a safe zone to manage flare-ups
For premium cuts like A5 Japanese wagyu or American wagyu beef, the two-zone setup is essential. These heavily marbled steaks render fat rapidly over direct heat, and without a cool zone to retreat to, the constant fat drip creates uncontrollable flare-ups that will incinerate a $100 steak in seconds.
The Three-Zone Setup: Advanced Control
The three-zone configuration adds a medium zone between hot and cool, creating a more gradual temperature gradient. This setup is particularly valuable for larger grills and when cooking multiple items that require different heat levels simultaneously.
On a Charcoal Grill
Create a sloped coal bed: stack coals two to three layers deep on one side, taper to a single layer in the middle, and leave the far side empty. This produces three distinct zones:
- High zone: 500–650°F (deep coal bed)
- Medium zone: 350–450°F (single coal layer)
- Low/indirect zone: 250–325°F (no coals)
On a Gas Grill
Set burners to high on one end, medium in the middle, and off on the far side. Most four-burner gas grills can achieve three clean zones with this approach.
When to Use Three-Zone
The three-zone setup shines when you're cooking a full spread—searing steaks on high, grilling vegetables on medium, and holding finished items warm on the cool side. It's also excellent for large cuts like tri-tip or pork shoulder steaks that benefit from a medium sear rather than maximum heat.
Temperature Ranges by Zone
Precision matters. Here are the temperature ranges I've measured across hundreds of grill sessions, organized by zone and fuel type:
High/Direct Zone
Charcoal: 500–700°F at grate level (lump charcoal runs hotter than briquettes by 50–75°F on average).
Gas: 450–550°F on most consumer grills at maximum output.
Purpose: Maillard reaction, caramelization, char development. Ideal contact time: 60–120 seconds per side for searing.
Medium Zone
Charcoal: 350–450°F (single-layer coal bed or perimeter of the direct zone).
Gas: 325–425°F (medium burner setting).
Purpose: Cooking through thinner proteins, grilling vegetables, toasting buns. Most foods spend the majority of their cook time here.
Low/Indirect Zone
Charcoal: 225–325°F (lid closed, no coals beneath food).
Gas: 250–350°F (adjacent burners on low, food over unlit burners).
Purpose: Slow roasting, collagen breakdown, gentle rendering, holding cooked food. This is where tough cuts become tender and thick steaks cook evenly.
Always verify with a reliable thermometer. The built-in dome thermometers on most grills read 50–75°F higher than actual grate-level temperature because they're measuring air near the lid, not at the cooking surface.
Which Foods Belong in Which Zone
Matching food to zone isn't arbitrary—it's determined by the food's thickness, fat content, connective tissue, and target doneness. Here's a science-based breakdown:
High/Direct Zone Foods
- Thin steaks (<1 inch): Strip steaks, skirt steak, flank steak. These cook through quickly, so high heat is needed to develop a crust before the interior overshoots.
- Burgers: The high-fat ground blends (70/30 or 80/20) need aggressive heat to set the exterior before the patty falls apart.
- Shrimp and scallops: Small, lean proteins that need intense heat for browning in the 2–3 minutes before they overcook.
- Vegetables for charring: Asparagus, peppers, corn—high heat develops smoky flavor in minutes.
Medium Zone Foods
- Bone-in chicken pieces: Thighs and drumsticks need time for fat to render and joints to reach 175°F+. Medium heat prevents skin burning while the interior catches up.
- Sausages and hot dogs: The casings can burst over high heat. Medium zone allows even heating and controlled rendering.
- Fish fillets: Salmon, mahi-mahi, and swordfish steaks do best over moderate heat where they can develop color without drying out.
- Thick-cut vegetables: Zucchini planks, onion rounds, and portobello caps need time to soften through.
Low/Indirect Zone Foods
- Thick steaks (>1.5 inches): Tomahawks, cowboy cuts, and thick wagyu ribeyes should spend most of their time here before a final sear.
- Whole chickens and spatchcocked poultry: Indirect heat acts like an oven, cooking the bird evenly without scorching the skin.
- Pork tenderloin and loin roasts: Lean cuts that dry out over direct heat but thrive in the 325°F indirect environment.
- Ribs: Whether baby back or spare ribs, the indirect zone provides the 250–275°F environment needed for collagen conversion over 3–5 hours.
Managing Zone Temperatures: Charcoal vs. Gas
The fuel you use fundamentally changes how you manage grilling temperature zones. Each has distinct advantages and challenges.
Charcoal Temperature Management
Airflow is everything. On a charcoal grill, temperature is controlled primarily through the intake (bottom) and exhaust (top) vents. The intake vent controls oxygen supply to the coals and has the most dramatic effect on temperature. Opening it fully can raise the direct zone by 100°F+ within minutes; closing it to a quarter-inch gap drops temperature steadily over 10–15 minutes.
Coal arrangement determines zone intensity. The Minion method (placing lit coals on one end of unlit coals) creates a slowly expanding heat zone—excellent for long cooks. For grilling, a concentrated pile gives you a defined hot zone with clear boundaries.
Fuel matters. Lump hardwood charcoal burns hotter (up to 700°F+) but less evenly than briquettes. Briquettes provide more consistent temperatures and longer burn times. For zone cooking, I prefer briquettes for their predictability, with a handful of lump added over the direct zone when I need extra searing heat.
The water pan trick. Placing a disposable aluminum pan filled with hot water in the indirect zone serves two purposes: it absorbs and moderates radiant heat from adjacent coals, and the evaporating moisture keeps the indirect zone humid, reducing surface dehydration of the food.
Gas Temperature Management
Burner control is straightforward but less nuanced. Gas grills offer convenient zone creation through individual burner controls, but they have a narrower temperature range. Most consumer gas grills max out around 550°F—well below what a charcoal grill can achieve.
Preheating is critical. Gas grills need 10–15 minutes of preheating with the lid closed to fully saturate the grill grates and heat deflectors with thermal energy. Skipping this step results in poor searing performance regardless of zone configuration.
Wind sensitivity. Gas grills lose more heat to wind than charcoal grills because the flame can deflect and reduce its contact with the heat plates. On windy days, position the grill so the wind hits the side, not the front or back, and increase burner settings by one level to compensate.
Infrared burners change the equation. Some gas grills include a dedicated infrared sear burner that can reach 700–900°F. If your grill has one, use it as your high zone and set the main burners to create medium and low zones across the remaining surface.
Using Grilling Temperature Zones for the Reverse Sear
The reverse sear is the single most impactful technique enabled by grilling temperature zones, and it's backed by clear thermodynamic logic. Traditional searing (high heat first, then indirect to finish) creates the gray band problem described earlier. The reverse sear flips the sequence: slow indirect cooking first, then a final high-heat sear.
The Method
- Set up a two-zone grill. Target 225–275°F in the indirect zone.
- Place the steak in the indirect zone. Insert a probe thermometer and close the lid.
- Cook to 10–15°F below your target. For medium-rare (131°F final), pull at 115–120°F. This takes roughly 25–45 minutes depending on thickness.
- Rest briefly (5 minutes) while you stoke the direct zone. Open all vents on charcoal or crank gas burners to maximum.
- Sear over direct heat for 60–90 seconds per side. The already-dry surface (dehydrated during the indirect phase) browns faster and more evenly than a cold steak placed over high heat.
Why It Works
During the indirect phase, the steak's temperature rises slowly and uniformly. The moisture on the surface gradually evaporates, creating a dry exterior that undergoes the Maillard reaction almost instantly when it hits the direct zone. The result is a thinner, more uniform crust with virtually no gray band—the internal color reads medium-rare from edge to edge.
This technique is transformative for thick, premium cuts. If you're investing in American wagyu ribeyes or prime-grade tomahawks, the reverse sear ensures you're getting maximum value from every ounce of marbling. The slow indirect phase renders intramuscular fat gently, while the final sear creates the flavor compounds that make a great steak unforgettable.
Temperature Zone Timing Guide for Reverse Sear
Based on my testing with 1.5–2 inch steaks at a 250°F indirect zone:
- Rare (125°F final): 20–30 min indirect, pull at 110°F, sear 60 sec/side
- Medium-rare (131°F): 30–40 min indirect, pull at 115°F, sear 75 sec/side
- Medium (140°F): 35–45 min indirect, pull at 125°F, sear 75 sec/side
- Medium-well (150°F): 40–50 min indirect, pull at 135°F, sear 60 sec/side
Note the shorter sear time for medium-well—the interior is already closer to target, so you need less contact time to avoid overshooting.
Putting It All Together
Grilling temperature zones aren't a hack or a shortcut—they're the foundation of competent live-fire cooking. Whether you're working with a $30 kettle grill or a $3,000 built-in gas unit, the physics are identical. Create distinct heat environments, understand which foods belong where, and use the gradient between zones to your advantage.
Start with the two-zone setup on your next cook. Grill a thick steak using the reverse sear method. Measure temperatures at grate level, not the dome. Take notes. Within three or four sessions, zone management will become second nature—and the quality gap between your grilling and a professional kitchen's will narrow dramatically.
The grill doesn't need to be smarter. You just need to use the heat it already produces more intelligently.
Frequently Asked Questions
What are grilling temperature zones?
Grilling temperature zones are distinct heat regions on your grill created by varying the placement and intensity of your fuel source. A typical setup includes a hot direct zone (450–700°F) over the coals or lit burners and a cooler indirect zone (225–350°F) with no fuel beneath. These zones let you sear, roast, and hold food at different temperatures on the same grill.
How do I set up a two-zone fire on a charcoal grill?
Bank all lit charcoal to one side of the charcoal grate, leaving the other side empty. The coal side becomes your direct/high zone for searing, while the empty side becomes your indirect/low zone for gentle cooking. Close the lid to stabilize temperatures and control heat with the intake and exhaust vents.
What is the best zone for cooking thick steaks?
Thick steaks (1.5 inches or more) perform best using both zones in a reverse sear: start in the indirect zone at 225–275°F until the internal temperature reaches 10–15°F below your target, then finish with a 60–90 second sear per side over direct high heat. This produces edge-to-edge even doneness with a well-developed crust.
Can I create temperature zones on a gas grill?
Yes. Light the burners on one side of the grill and leave the opposite burners off. The lit side is your direct zone and the unlit side is your indirect zone. For a three-zone setup on a four-burner grill, set burners to high, medium, and off from one end to the other.
Why does my dome thermometer read differently than grate temperature?
Dome thermometers measure air temperature near the top of the lid, which is typically 50–75°F higher than the actual grate-level temperature where your food sits. For accurate zone management, use a grate-level probe thermometer or an instant-read thermometer held at cooking height.
What temperature is the indirect zone on a grill?
The indirect zone typically ranges from 225°F to 350°F depending on your fuel type, the amount of fuel in the direct zone, vent settings (charcoal), and whether the lid is closed. For low-and-slow cooking, aim for 225–275°F. For indirect roasting, 300–350°F works well.
More Expert Guides
Steak Doneness Temperature Guide: The Science of Every Level from Rare to Well Done
Every degree matters. This science-backed guide covers the exact internal temperatures for every steak doneness level, why each temperature produces a different texture, and how to nail your target every time.
14 min readDirect vs Indirect Heat Grilling: The Science of Two-Zone Cooking
Direct heat sears. Indirect heat roasts. Understanding the physics of each — and when to combine them — is the foundation of every great grilling technique.
14 min readResting Meat After Cooking: The Science of Why It Makes Every Steak Juicier
Resting meat after cooking is not optional — it is physics. Here is exactly what happens inside the steak during those crucial minutes and how long to rest every cut.