The Reverse Sear Method: A Complete Scientific Guide
The reverse sear is, in my professional opinion, the single best method for cooking a thick steak. Not because it's trendy — because the physics are overwhelmingly in your favor. You're working with thermodynamics instead of against them, and the result is edge-to-edge even doneness with a deeply browned crust. No gray band. No guesswork.
I spent three years in the USDA lab measuring thermal gradients in steaks cooked by different methods. The data was unambiguous: low-and-slow followed by high-heat searing produced the narrowest temperature differential between the surface and center of any method we tested. The reverse sear wasn't close to the best — it was the best by a significant margin.
What Is the Reverse Sear?
Traditional steak cooking starts with high heat (the sear) and finishes with indirect or lower heat. The reverse sear flips this sequence: you start with low, indirect heat to bring the steak's internal temperature up slowly, then finish with an extremely hot sear to create the Maillard crust.
Think of it like warming a house. If you blast the furnace on maximum, the air near the vents gets scorching while the far rooms stay cold. If you warm the house gradually with moderate heat, every room reaches a comfortable temperature. Then you can light the fireplace for that final burst of warmth right where you're sitting. The steak works the same way — the "rooms" are the layers of protein from surface to center.
The Physics: Why It Works
Heat transfer in a steak follows Fourier's law of thermal conduction. The rate of heat flow is proportional to the temperature difference between the heat source and the steak's interior. When you throw a steak on a 700°F grill, the temperature differential between the surface (which quickly reaches 300°F+) and the cold center (40°F from the fridge) is enormous — over 250°F.
That steep thermal gradient means the outer layers overcook rapidly while heat slowly crawls toward the center. By the time the center reaches 131°F (medium-rare), the outer 1/4 to 1/2 inch has blown past 160°F and entered well-done territory. That's the gray band — the visual evidence of an aggressive thermal gradient.
The reverse sear solves this by using a low-temperature environment (225–275°F oven or indirect grill) for the first phase. The temperature differential between heat source and steak interior is much smaller — maybe 200°F instead of 650°F. Heat penetrates more evenly, and the steak approaches your target temperature uniformly throughout. The thermal gradient stays shallow.
The Drying Effect: A Hidden Advantage
There's a second physics benefit that most people overlook. During the low-heat phase, the steak's surface loses moisture through evaporation. A dry surface is critical for the Maillard reaction — the chemical browning that creates the crust. Water on the surface caps the temperature at 212°F (the boiling point), preventing the 280°F+ temperatures needed for Maillard chemistry.
By the time you're ready to sear, the surface is already dehydrated. This means you get a deeper, more flavorful crust in less time — 45 to 60 seconds per side instead of 2 to 3 minutes. Less searing time means less additional heat penetration into the interior, which preserves that even doneness you worked to build.
Step-by-Step: The Reverse Sear Method
What You Need
- A thick steak: Minimum 1.25 inches, ideally 1.5 to 2 inches. Thickness matters — thin steaks cook too fast for this method to provide a meaningful advantage. Ribeye, NY strip, filet mignon, or any thick-cut steak works.
- A reliable probe thermometer: I use a leave-in probe (ThermoWorks Smoke or Signals) so I can monitor temperature without opening the oven. This is not optional equipment — it's essential.
- An oven or grill: Set to 225–275°F. Lower is more forgiving; higher is faster.
- A screaming-hot searing surface: Cast iron skillet, carbon steel pan, or a grill cranked to maximum. You need 600°F+ surface temperature.
- Salt: Season generously at least 45 minutes before cooking, or dry brine overnight in the fridge.
Phase 1: The Low-Heat Cook
Target internal temperature: 115–120°F (for a final target of 131°F medium-rare)
Place the steak on a wire rack set over a sheet pan. Insert your leave-in probe into the geometric center of the thickest part. Place in a 250°F oven.
Timing depends on thickness, starting temperature, and oven temp, but expect roughly:
- 1.25-inch steak: 25–35 minutes
- 1.5-inch steak: 35–45 minutes
- 2-inch steak: 45–60 minutes
Don't cook by time. Cook by temperature. Pull when the probe reads 115°F for medium-rare, 125°F for medium. The sear will add 10–15°F, and carryover cooking during the brief rest will add another 3–5°F.
Phase 2: The Sear
Heat your cast iron skillet over the highest heat your stove produces for at least 5 minutes. You want the pan surface above 600°F — if you have an infrared thermometer, use it. Add a high-smoke-point oil (avocado oil, refined safflower) just before the steak goes in.
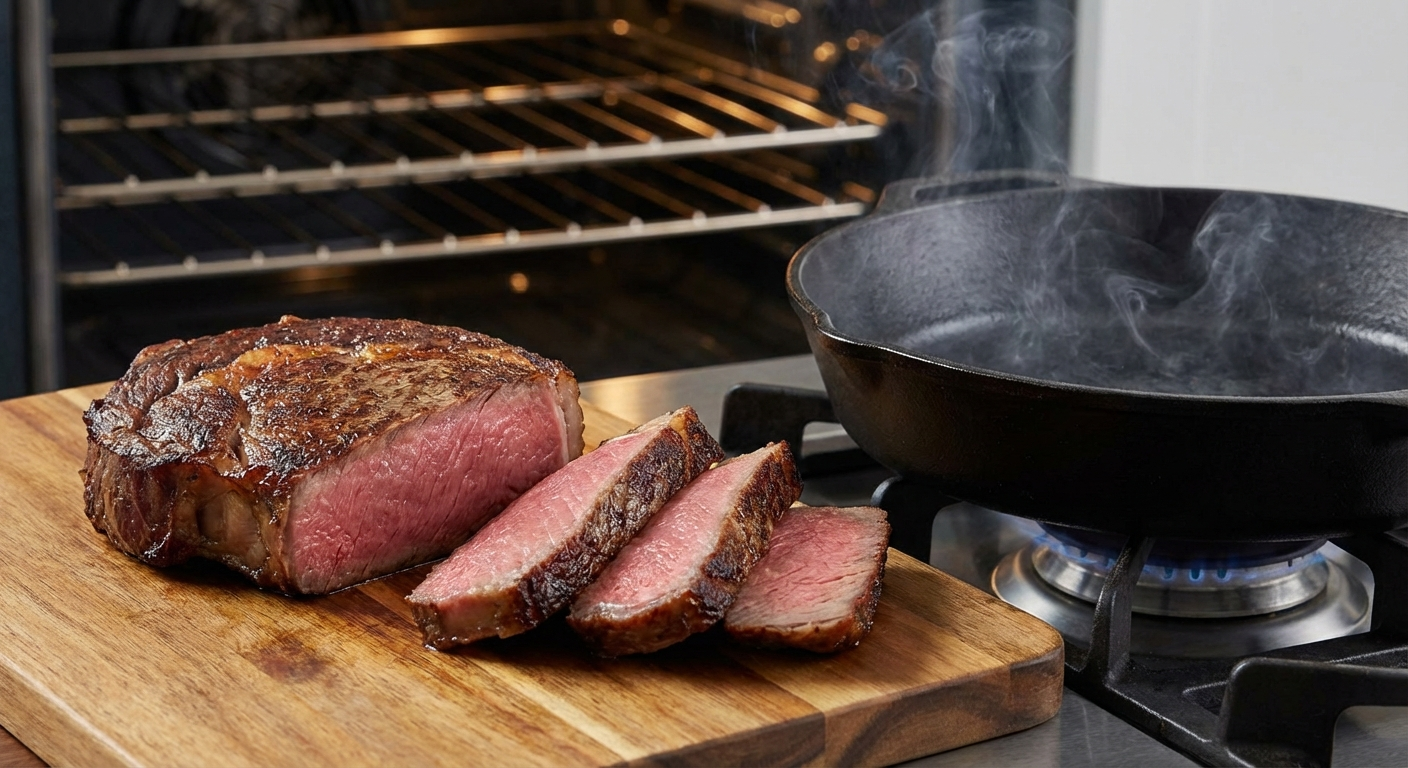
Sear for 45–60 seconds per side. You're looking for deep mahogany brown, not light tan. Don't move the steak during each sear — constant contact with the hot metal is what creates the crust. This method works beautifully with premium wagyu steaks as well as conventional cuts. If your steak has a thick fat cap (like a NY strip), hold it on its edge with tongs for 30 seconds to render and brown the fat.
Optional but recommended: add butter, crushed garlic, and fresh thyme to the pan during the last 15 seconds. Baste the steak by tilting the pan and spooning the foaming butter over the surface. This adds flavor and accelerates the Maillard reaction on the top surface.
Phase 3: Rest and Serve
Rest the steak on a cutting board for 5 minutes. Because the steak was cooked gently and the interior temperature is relatively uniform, you don't need a long rest — the juice redistribution happens faster when there's less temperature differential between the center and the edges.
Check the final internal temperature with an instant-read. You should be within 2–3°F of your target. For medium-rare, the center should read 129–133°F.
Temperature Targets for the Reverse Sear
| Doneness | Pull from Oven | After Sear + Rest | Center Color |
|---|---|---|---|
| Rare | 105°F | 120–125°F | Cool red center |
| Medium-Rare | 115°F | 129–133°F | Warm red center |
| Medium | 125°F | 138–142°F | Warm pink center |
| Medium-Well | 135°F | 148–152°F | Slight pink |
These numbers account for approximately 10–15°F from the sear and 3–5°F from carryover. Your specific results will vary by steak thickness, sear duration, and pan temperature — which is why a thermometer is non-negotiable.
Common Mistakes and How to Avoid Them
Mistake 1: Oven Temperature Too High
At 325°F or above, you lose most of the reverse sear's advantage. The thermal gradient steepens, and you start approaching conventional oven-roasting territory. Stay at 250°F or below for the best edge-to-edge results. If you're in a rush, 275°F is acceptable. Above that, you're compromising.
Mistake 2: Skipping the Thermometer
The reverse sear is a precision method. Without a thermometer, you're guessing — and that defeats the entire purpose. A ThermoWorks Thermapen (instant-read) costs about $100 and is the single best kitchen investment you'll make. A leave-in probe system like the Smoke is even better for the oven phase.
Mistake 3: Not Getting the Pan Hot Enough
If your pan isn't screaming hot, you'll spend too long searing, which defeats the purpose. The steak's interior temperature keeps climbing during the sear — a 60-second sear adds roughly 10°F to the center. A 3-minute sear (because the pan was too cool) could add 25°F and push you past your target. Get the pan hot. Really hot.
Mistake 4: Using a Thin Steak
The reverse sear provides diminishing returns below 1.25 inches. A 3/4-inch steak cooks so quickly in the oven that there's barely time for a gradient to form in the first place. For thin steaks, just use a ripping-hot pan from start to finish. Save the reverse sear for thick cuts where it makes a measurable difference.
Reverse Sear vs. Other Methods
vs. Traditional Sear-First
The traditional method (sear, then finish in oven) produces a gray band roughly 2–3x wider than the reverse sear for the same final internal temperature. The sear-first approach was standard for decades, and it produces a good steak — but the reverse sear produces a measurably better one for thick cuts.
vs. Sous Vide
Sous vide produces perfectly even doneness (zero thermal gradient, since the water bath holds an exact temperature), but the surface is wet when it comes out of the bag. That moisture requires a longer, hotter sear to evaporate before Maillard browning begins — and that longer sear creates a small gray band. The reverse sear's pre-dried surface gives it a slight edge in crust quality, though sous vide wins on internal consistency.
vs. Grilling (Direct Heat Only)
Direct grilling over high heat works fast but creates the widest gray band of any common method. It's fine for thin steaks (under 1 inch) where you're cooking the entire cross-section quickly. For thick cuts, it's the least precise option. The reverse sear on a grill (indirect zone first, then direct sear) gives you the best of both worlds.
Adapting the Method: Oven, Grill, and Smoker
Oven Reverse Sear
The most controlled environment. Set to 250°F, use a wire rack over a sheet pan, and finish in a cast iron skillet on the stovetop. This is my default method for weeknight steak.
Grill Reverse Sear
Set up a two-zone fire: coals on one side, steak on the other (indirect). Close the lid and maintain 225–275°F. When the steak hits your pull temperature, move it directly over the coals for the sear. Grill reverse sear adds a subtle smoke flavor that the oven method doesn't provide.
Smoker Reverse Sear
Same principle as the grill, but with wood smoke. Run the smoker at 225°F with oak, hickory, or cherry wood. The steak absorbs smoke flavor during the 30–60 minute low-heat phase. Finish on a blazing-hot grill grate or cast iron pan. This is my preferred method for a 2-inch bone-in ribeye when I have the time.
Frequently Asked Questions
What temperature should I set my oven for the reverse sear?
Set your oven to 225–275°F. Lower temperatures (225°F) produce the most even doneness but take longer. 250°F is the sweet spot for most cooks — it balances precision with reasonable cooking times of 35–50 minutes for a 1.5-inch steak.
Does the reverse sear work on thin steaks?
The reverse sear provides diminishing returns on steaks thinner than 1.25 inches. Thin steaks cook so quickly that the thermal gradient doesn't have time to become a problem. For steaks under 1 inch, a hot pan or grill with direct heat is more practical and produces excellent results.
Can I reverse sear without a thermometer?
Technically yes, but you're removing the main advantage. The reverse sear is a precision method — the whole point is controlling the internal temperature precisely. Without a thermometer, you're guessing, which is no different from any other cooking method. A ThermoWorks Thermapen or similar instant-read thermometer is a strongly recommended investment.
How much does the sear raise the internal temperature?
A 45–60 second sear per side in a properly heated (600°F+) cast iron pan typically raises the center temperature of a 1.5-inch steak by 10–15°F. A longer or cooler sear can vary this. That's why we pull from the oven 10–15°F below the final target.
Should I rest the steak after the reverse sear?
A 5-minute rest is sufficient. Because the reverse sear produces such even internal temperatures, there's less of a temperature differential driving moisture toward the center — so the rest phase is shorter than with conventional cooking methods. Don't skip it entirely, but you don't need the 10-minute rests that sear-first steaks require.
More Expert Guides
Grill Vent Management: The Science of Airflow and Temperature Control
Oxygen controls fire. Fire controls temperature. Vents control oxygen. Master your vents and you master your grill.
12 min readHow Often to Flip Steak: The Science of Multiple Flips vs Single Flip
The traditional advice to flip your steak only once is wrong. Science shows that flipping every 30 seconds produces better crust, more even doneness, and 30% faster cooking through improved heat transfer.
12 min readThe Science of Plancha Grilling: How High Heat and Flat Surfaces Create Superior Crust
Plancha grilling delivers more surface contact, higher heat, and better crust than traditional grates. Here is the science behind why flat-top cooking produces superior results.