Grilling Heat Transfer Methods Explained: Conduction, Convection & Radiation

Grilling Heat Transfer Methods Explained: Conduction, Convection & Radiation
After two decades of studying thermal dynamics in cooking, I can tell you that the single biggest misconception about grilling is this: people think it's just "hot grill, cook meat." In reality, every time you grill, you're orchestrating three distinct heat transfer methods simultaneously—conduction, convection, and radiation—each contributing differently to how your food cooks.
Understanding these three methods isn't academic exercise. It's the difference between knowing why your steak cooks the way it does and being able to predict, control, and optimize every cook. It's why a thick ribeye needs different treatment than chicken thighs. It's why closing your grill lid fundamentally changes the cooking environment.
Let me break down each heat transfer method, show you exactly how they work in your grill, and teach you how to harness them for perfect results every single time.
What Is Heat Transfer? The Foundation
Heat transfer is the movement of thermal energy from a hotter object to a cooler one. In grilling, heat moves from your fuel source (charcoal, gas, wood) to your food through three mechanisms:
- Conduction: Direct contact heat transfer (grill grates touching meat)
- Convection: Heat transfer through moving air or liquid
- Radiation: Heat transfer through electromagnetic waves (infrared energy)
These aren't mutually exclusive. When you grill a premium steak, all three are happening simultaneously in different proportions. The art of grilling is learning to emphasize the right method for the right situation.

Conduction: The Power of Direct Contact
Conduction is heat transfer through direct physical contact between objects. When your steak touches a hot grill grate, thermal energy flows from the metal directly into the meat. At the molecular level, the rapidly vibrating atoms in the hot grate collide with atoms in the meat's surface, transferring kinetic energy.
How Conduction Works on Your Grill
Every time you see grill marks on your food, you're looking at evidence of conduction. Those dark sear lines form where the meat made direct contact with superheated metal grates. The temperature differential drives rapid heat transfer—a grate at 500°F touching meat at 40°F creates an enormous thermal gradient that drives aggressive energy flow.
Conduction is incredibly efficient compared to the other methods. Metal is an excellent thermal conductor, which is why a cast-iron grate sears more aggressively than a stainless steel one (cast iron has higher thermal mass and retains heat better during initial contact).
Temperature Ranges for Conduction Cooking
The ideal grate surface temperature for conduction-based searing depends on what you're cooking:
- 450-500°F: Perfect for thin steaks (under 1 inch), burgers, fish filets, and vegetables. High enough for rapid Maillard browning without excessive charring.
- 500-550°F: Ideal for thick steaks (1.5+ inches) where you want aggressive initial searing before moving to indirect heat. Creates restaurant-quality crust.
- 550-600°F+: Professional steakhouse territory. Used for very brief, intense sears on premium wagyu or when doing a flash sear after reverse-searing.
- 350-400°F: More moderate conduction heat, suitable for delicate proteins like chicken breast or pork tenderloin where you want browning without burning.
Use an infrared thermometer to measure actual grate temperature—your grill's dome thermometer reads ambient air temperature, which can be 50-100°F cooler than the grate surface.
Controlling Conduction Heat
You have several levers to control conduction intensity:
1. Grate Material and Thickness
Cast iron grates retain and transfer heat more effectively than thin stainless steel. Thicker grates have higher thermal mass, meaning they don't cool down as quickly when cold meat is placed on them. For maximum conduction searing, cast iron or thick stainless grates win every time.
2. Preheating Time
Heat your grill grates for at least 10-15 minutes before cooking. Insufficient preheating means the grates cool dramatically when food is added, reducing conduction efficiency. A properly preheated grate maintains temperature better and delivers consistent searing.
3. Surface Moisture
Wet surfaces create a steam barrier that reduces conduction efficiency. Always pat your chicken or steak completely dry before grilling. Water between the grate and meat acts as an insulator.
4. Contact Pressure
Using a grill press or weighted foil-wrapped brick increases surface contact, improving conduction heat transfer. This is especially useful for irregularly shaped foods like butterflied chicken or bone-in chops.
5. Oil Application
A thin layer of high-smoke-point oil (avocado, grapeseed) improves thermal contact between grate and meat, filling microscopic air gaps. Oil is a better conductor than air, so this small detail actually matters for optimal searing.

Best Uses for Conduction-Dominant Grilling
- Searing steaks, chops, and burgers for crust development
- Creating grill marks on vegetables (asparagus, zucchini, peppers)
- Crisping fish skin
- Toasting buns
- Any time you want rapid surface browning via the Maillard reaction
Common Conduction Mistakes
Moving food too soon: When you place protein on hot grates, it initially sticks. As a proper sear forms, the meat releases naturally. Trying to flip too early tears the crust and interrupts conduction heat transfer.
Using cold meat: Refrigerator-cold steaks cool your grates significantly, reducing conduction efficiency. Let meat rest at room temperature for 30-45 minutes before grilling.
Overcrowding: Placing too much food at once drops grate temperature dramatically. Work in batches for optimal conduction searing.
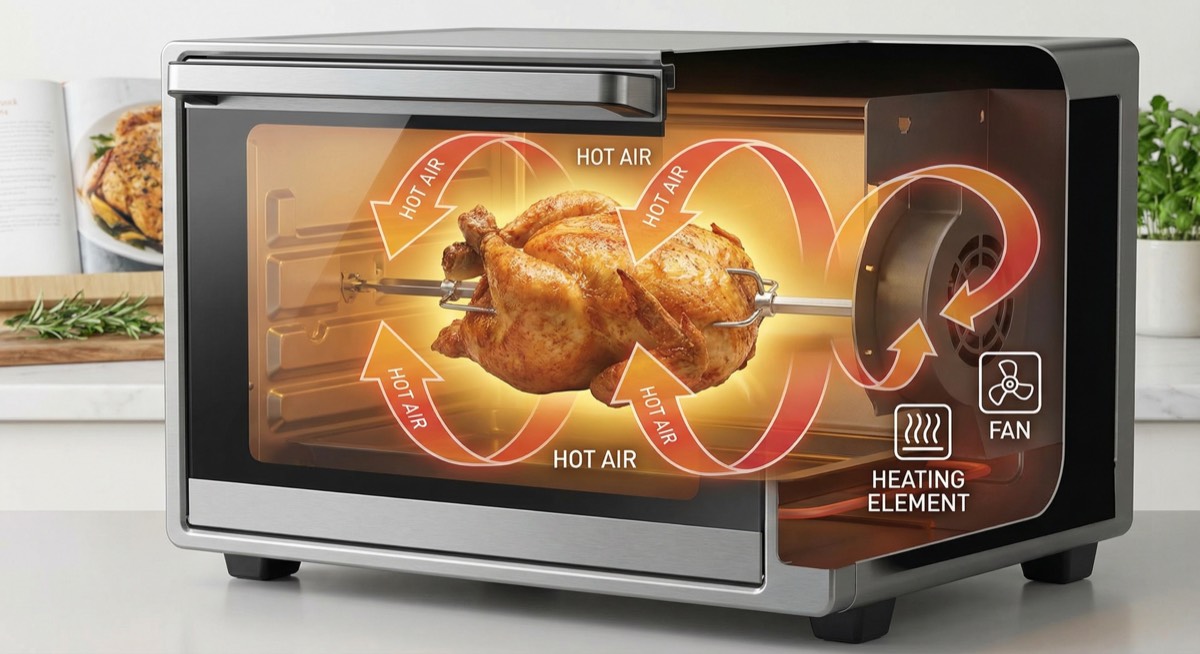
Convection: The Air Movement Factor
Convection is heat transfer through the movement of fluids—in grilling, that means hot air circulating around your food. Unlike conduction's direct contact, convection heats through currents of heated air flowing over and around the food's surface.
How Convection Works on Your Grill
When you close your grill lid, you create a convection oven environment. Hot air rises from the heat source, circulates around the cooking chamber, and flows over your food from all angles. This creates more even heating than conduction alone, which only affects the surfaces touching the grates.
The efficiency of convective heat transfer depends on:
- Air temperature differential: Bigger difference between air temp and food temp drives faster heat transfer
- Air velocity: Faster-moving air removes the cool boundary layer around food more effectively
- Surface area exposure: More exposed surface area allows more convective heat absorption
In practical terms, this is why a bone-in pork shoulder cooks more evenly when you close the lid—convective heat reaches all surfaces, not just the bottom touching the grate.
Temperature Ranges for Convection Cooking
Convection is most effective within specific temperature ranges for different cooking goals:
- 225-275°F: Low-and-slow barbecue range. Gentle convective heat slowly breaks down connective tissue in tough cuts. Ideal for brisket, ribs, pulled pork. Requires 8-16+ hours depending on size.
- 300-350°F: Medium convection roasting. Perfect for whole chickens, turkey, pork loin, leg of lamb. Cooks through without excessive surface drying. Typically 15-25 minutes per pound.
- 375-425°F: High convection roasting. Used for cooking whole fish, spatchcocked chicken, or when you want faster cooking with good browning. The air is hot enough to drive Maillard reactions on exposed surfaces.
- 450°F+: Very hot convection creates an oven-like environment while maintaining grill flavor. Useful for pizza, bread, or when reverse-searing (low convection followed by high conduction sear).
Controlling Convection Heat
1. Lid Position
This is your primary convection control. Lid open = minimal convection (air isn't contained or directed). Lid closed = maximum convection. For thick cuts that need internal cooking, keep the lid closed. For thin items that cook quickly via conduction, leave it open.
2. Vent Settings
On charcoal grills, top and bottom vents control airflow. More airflow = hotter fire = more intense convection. Closing vents partway reduces temperature. On gas grills, burner settings control heat, but vents (if present) can still modulate convection intensity.
3. Direct vs. Indirect Setup
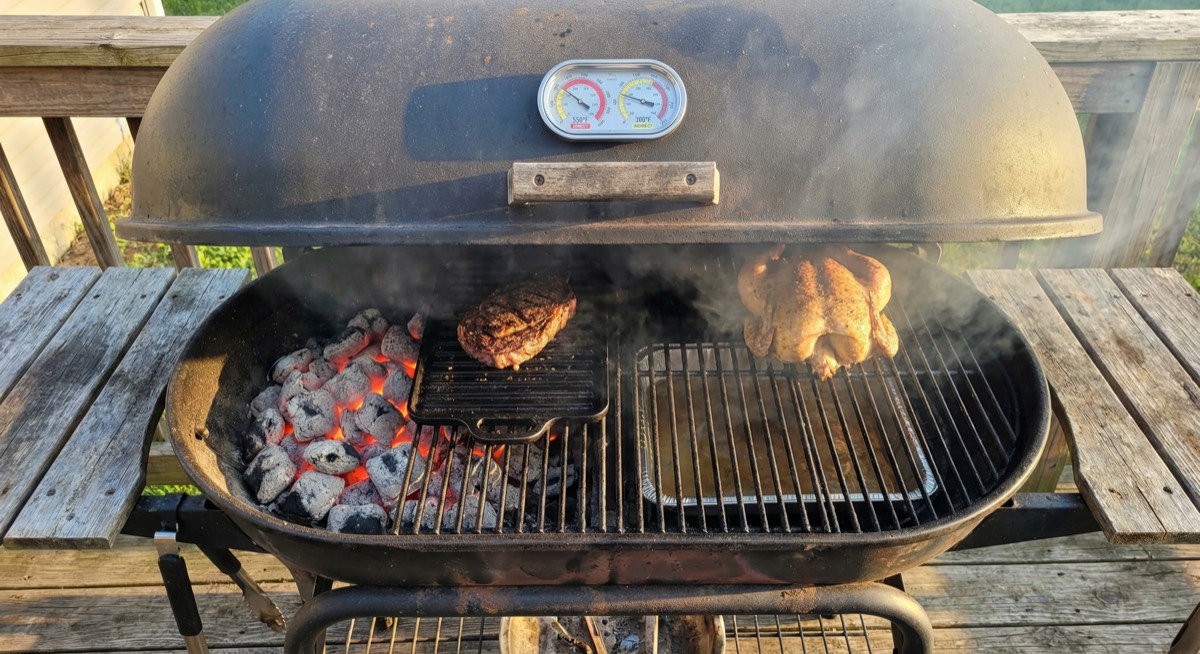
Positioning food away from the direct heat source (two-zone cooking) relies primarily on convection rather than radiation and conduction. The food cooks from circulating hot air rather than direct flame/radiant heat. This is essential for large roasts or delicate items that would burn over direct heat.
4. Water Pans and Heat Diffusers
Placing a water pan in your grill moderates temperature swings and adds humidity to the convective air. This prevents surface drying during long cooks. Heat diffusers (ceramic plates, lava rocks) spread heat more evenly, creating gentler convective currents.
Best Uses for Convection-Dominant Grilling
- Whole chickens, turkeys, and other large birds
- Roasts (prime rib, pork loin, leg of lamb)
- Low-and-slow barbecue (brisket, ribs, pulled pork)
- Thick steaks using reverse-sear method (convection first, conduction finish)
- Baking on the grill (pizza, bread, casseroles)
- Any food requiring even, all-around heating
Common Convection Mistakes
Opening the lid too frequently: Every time you lift the lid, you release the accumulated hot air and disrupt convection currents. It can take 3-5 minutes to rebuild temperature. "If you're looking, you're not cooking" isn't just a saying—it's thermodynamics.
Ignoring hot spots: Most grills have uneven convection patterns with hotter zones near the heat source. Learn your grill's hot spots and rotate food accordingly for even cooking.
Wrong positioning: For indirect convection cooking, center the food between two heat sources (if possible) or directly opposite a single heat source. Poor positioning leads to uneven convective heating.
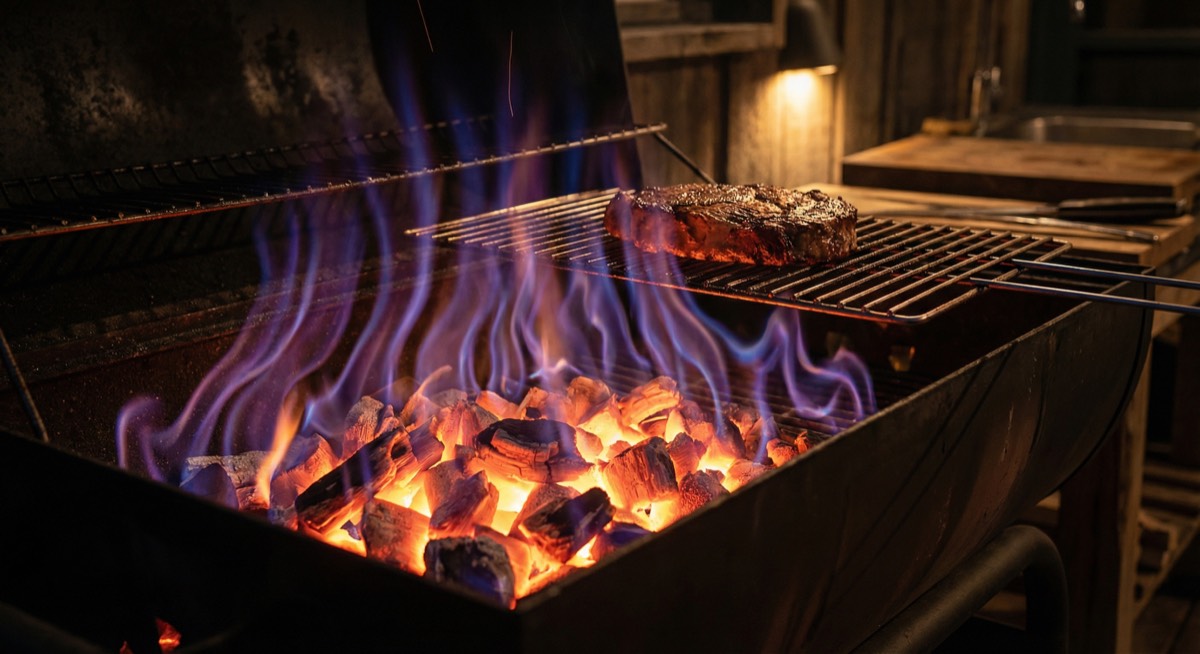
Radiation: The Infrared Energy
Radiation is heat transfer through electromagnetic waves—specifically, infrared radiation. Unlike conduction and convection, radiation doesn't require any physical medium (no contact, no air). Radiant energy travels through space and is absorbed directly by your food's surface.
How Radiation Works on Your Grill
When charcoal glows red or gas burners heat ceramic plates until they're incandescent, they're emitting intense infrared radiation. This energy travels in straight lines until it hits something—like your steak—where it's absorbed and converted to heat.
Radiant heat is incredibly powerful for surface cooking. It's why you can hold your hand six inches above glowing coals for only a second or two—the infrared radiation is directly heating your skin without needing to heat the air in between.
The intensity of radiant heat follows the inverse square law: double the distance, and you receive one-quarter the radiant energy. This is why food cooks so much faster when positioned close to the heat source.
Temperature and Distance Relationships
Radiant heat intensity depends on both source temperature and distance:
- 2-3 inches from coals: Extreme radiant heat (600-800°F equivalent). Used for flash-searing, charring peppers, or achieving steakhouse-level crust in seconds. Risk of burning before internal cooking is high.
- 4-6 inches from coals: Intense radiant heat (450-550°F equivalent). Ideal for normal direct grilling of steaks, chops, burgers. Provides rapid surface cooking with manageable char risk.
- 8-10 inches from coals: Moderate radiant heat (350-400°F equivalent). Suitable for chicken pieces, fish, vegetables. Allows some internal cooking before surface burns.
- 12+ inches from coals: Gentle radiant heat (250-300°F equivalent). Useful for indirect cooking where you want some radiant contribution but primarily rely on convection.
Adjustable grate height (common on kamado-style grills and some charcoal grills) gives you precise control over radiant heat exposure.
Controlling Radiation Heat
1. Distance Adjustment
Moving food closer to or farther from the heat source is the most direct way to control radiant heat intensity. If your grill doesn't have adjustable grates, you can create different heat zones horizontally (two-zone fire) rather than vertically.
2. Heat Source Type
Charcoal and wood produce more infrared radiation than gas burners because they burn at higher temperatures and create glowing coals. Gas grills compensate by using ceramic briquettes, lava rocks, or infrared burners (which heat ceramic plates to incandescence) to increase radiant output.
3. Shielding and Reflection
Placing aluminum foil or a drip pan between food and heat source reduces radiant heat transfer (creating more convection-dominant cooking). Conversely, reflective surfaces in the grill can redirect radiant heat, creating more even exposure.
4. Lid Color and Material
A closed lid reflects radiant heat back onto food from above, increasing total radiant exposure. Dark-colored grill interiors absorb and re-emit more infrared radiation than shiny surfaces. This is why many premium grills have dark enamel or porcelain interiors.
Infrared Grills: Radiation on Steroids
Dedicated infrared grills use ceramic or metal plates heated to extremely high temperatures (1000°F+) to produce intense radiant heat. This allows searing at steakhouse intensity in your backyard. The radiant energy is so intense it can cook a 1-inch steak in under 4 minutes total.
Infrared grills excel at high-heat searing but offer less temperature range for low-and-slow cooking. Many hybrid grills now include an infrared burner alongside traditional burners, giving you both options.
Best Uses for Radiation-Dominant Grilling
- Direct grilling of steaks, chops, and burgers over hot coals
- Charring vegetables (peppers, eggplant, onions)
- Crisping skin on chicken thighs or duck breast
- Flash-searing wagyu steaks
- Achieving authentic char flavor on fajita meat or carne asada
- Any cooking where you want intense surface heat with minimal air temperature
Common Radiation Mistakes
Cooking too close for too long: Radiant heat is extremely intense. What works for a 30-second sear will carbonize your food in 5 minutes. Match distance to cooking time.
Ignoring flare-ups: Dripping fat igniting creates intense radiant heat from flames. While a little char is fine, sustained flare-ups burn food before it cooks through. Keep a spray bottle handy or move food temporarily.
Not accounting for carryover: Radiant heat can continue cooking meat even after you remove it from the grill if the surface is extremely hot. Pull steaks 5°F before target temperature to compensate.
Combining All Three: The Grilling Sweet Spot
Mastery comes from understanding how to orchestrate all three heat transfer methods simultaneously. Here's how they work together in common grilling scenarios:
Scenario 1: Direct-Grilling a Thick Steak
When you place a 2-inch ribeye over hot coals with the lid open:
- Conduction (40%): Grill grates sear the bottom surface, creating grill marks and crust
- Radiation (50%): Intense infrared from glowing coals cooks the bottom and sides
- Convection (10%): Minimal—ambient air isn't contained or directed, so convective contribution is small
Result: Aggressive bottom searing, slower internal cooking. You'll need to flip multiple times or risk a charred exterior with a raw center.
Scenario 2: Indirect Roasting a Whole Chicken (Lid Closed)
Positioning a whole chicken away from direct heat with the lid closed:
- Convection (70%): Hot air circulates around the bird, cooking all surfaces evenly
- Radiation (25%): Reflected radiant heat from the lid and grill walls contributes to browning
- Conduction (5%): Minimal—only the small contact points where the chicken touches the grate
Result: Even, gentle cooking throughout. Crispy skin all around. Juicy interior. This is why lid-closed convection roasting is ideal for poultry.
Scenario 3: Reverse-Searing a Strip Steak
Phase 1 - Low indirect heat (lid closed):
- Convection (80%): Gentle 225°F air slowly brings internal temp to 115°F
- Radiation (15%): Low-level infrared contribution
- Conduction (5%): Minimal grate contact
Phase 2 - High direct heat sear (lid open):
- Conduction (60%): Screaming-hot grates create instant crust
- Radiation (35%): Intense infrared from peak-temperature coals
- Convection (5%): Minimal with lid open
Result: Perfect edge-to-edge medium-rare with a professional-quality crust. This technique is the ultimate expression of understanding heat transfer methods.
Practical Applications: Choosing the Right Method
Quick Reference Guide
Use Conduction-Dominant (direct, lid open) when you want:
- Aggressive surface searing and grill marks
- Fast cooking of thin proteins (under 1 inch)
- Maximum crust development
- Visual presentation (distinct grill marks)
Use Convection-Dominant (indirect, lid closed) when you want:
- Even cooking of thick or large items
- Gentle heat for delicate proteins
- Low-and-slow barbecue
- Roasting rather than grilling
- Reduced risk of burning
Use Radiation-Dominant (direct, high heat, lid open) when you want:
- Intense surface char (peppers, eggplant)
- Steakhouse-level searing
- Fast cooking with minimal internal temperature rise
- Authentic char flavor
Use Combined Methods (two-zone, lid closed) when you want:
- Best of both worlds (sear + gentle cooking)
- Reverse-searing thick steaks
- Chicken with crispy skin and juicy interior
- Flexibility to move food between zones as needed
Temperature Management: Your Control Panel
Understanding heat transfer methods only matters if you can measure and control them. Here's your toolkit:
Essential Tools
- Infrared thermometer: Measures actual grate surface temperature (conduction). Point and click for instant readings. Essential for consistent searing.
- Dome thermometer: Measures ambient air temperature (convection). Built into most grills, but verify accuracy with an oven thermometer.
- Instant-read meat thermometer: Monitors internal doneness. Heat transfer gets food to target temp—your thermometer confirms success.
- Two-zone setup: Creates options. Hot direct zone for conduction/radiation, cooler indirect zone for convection. Every grill should have this.
Adapting to Conditions
External factors affect heat transfer efficiency:
Cold weather: Convection suffers because ambient air is cold. Compensate by increasing fuel, preheating longer, and keeping lid closed. Conduction and radiation are less affected.
Wind: Disrupts convection patterns and steals heat. Shield your grill or cook on a calmer day. Wind also increases oxygen flow to charcoal, potentially making it burn hotter.
Altitude: Lower air pressure at altitude reduces convection efficiency and lowers water's boiling point. You may need longer cooking times and higher temperatures.
Humidity: High humidity reduces evaporative cooling, which can slightly accelerate cooking. Humid air also has higher heat capacity, improving convective heat transfer slightly.
Frequently Asked Questions
Why do infrared grills cook so much faster than regular gas grills?
Infrared grills produce dramatically more radiant heat energy than conventional gas grills. A standard gas burner heats air (convection) and metal grates (conduction), with some radiant heat as a byproduct. An infrared burner heats a ceramic or metal emitter to 1000°F+, creating intense radiant energy that cooks food directly without needing to heat the surrounding air first. This can reduce cooking time by 50% or more for high-heat applications like searing steaks.
Should I cook with the lid open or closed?
It depends on what you're cooking and which heat transfer method you want to emphasize. Lid open favors conduction and radiation—use it for thin, fast-cooking items like burgers or skirt steak where you want maximum sear and minimal internal cooking. Lid closed emphasizes convection—use it for thick cuts, whole chickens, or anything requiring even heat distribution and internal cooking. For thick steaks, I often sear lid-open, then finish lid-closed.
Why do my grill marks disappear when I close the lid?
Grill marks are created by intense conduction where metal grates contact meat. When you close the lid, you introduce convection currents that cook the unmarked areas between the grates, evening out the color difference. Additionally, moisture released during cooking can soften the crust. For prominent grill marks, sear lid-open until marks are well-defined, then move to indirect heat if additional cooking is needed.
What's the advantage of cast iron grates over stainless steel?
Cast iron has much higher thermal mass and better heat retention than stainless steel. When cold meat hits a cast iron grate, the grate temperature drops less dramatically, maintaining better conduction heat transfer. Cast iron also creates more pronounced sear marks due to concentrated heat at the contact points. The downside is that cast iron requires more maintenance (seasoning, rust prevention) and takes longer to preheat. For maximum searing performance, cast iron wins. For convenience and durability, stainless steel is easier.
How does convection on a grill compare to a kitchen oven?
A closed grill creates a convection environment similar to an oven, with one key difference: flavor. Grills introduce smoke from dripping fat and burning wood/charcoal, which infuses food with compounds you can't replicate in an oven. Temperature control is often less precise on a grill, and heat distribution may be less even, but the flavor payoff is significant. Modern kamado-style grills and pellet grills can match kitchen ovens for temperature stability while maintaining that grilled flavor.
Can I use a grill for low-and-slow cooking, or do I need a smoker?
Absolutely. Low-and-slow cooking is convection-dominant cooking in the 225-275°F range. Any grill that can maintain stable indirect heat in that range will work—charcoal grills with two-zone setups, gas grills with burners turned low, kamado grills with vents adjusted properly. Dedicated smokers offer better insulation and longer fuel economy, but grills can absolutely produce excellent barbecue. Add wood chunks for smoke flavor, use a water pan for humidity, and monitor temperature closely.
Conclusion: Heat Transfer Mastery
Understanding conduction, convection, and radiation transforms grilling from trial-and-error into a precise, predictable science. When you know that conduction creates sear marks, convection cooks evenly, and radiation delivers intense surface heat, you can diagnose problems and optimize techniques with confidence.
Pale, gray steak? Insufficient conduction and radiation—increase grate temperature and reduce distance to coals. Burned outside, raw inside? Too much radiation and conduction, not enough convection—use indirect heat or close the lid. Cooking taking forever? Boost convection by closing the lid and increasing air temperature.
Every time you fire up your grill, you're managing three heat transfer methods simultaneously. The grillers who consistently produce exceptional food aren't lucky—they understand the physics and adjust accordingly. Thick steak? Reverse-sear with gentle convection followed by aggressive conduction. Whole chicken? Convection-dominant indirect roasting with lid closed. Quick weeknight burgers? Conduction and radiation over direct heat, lid open.
Now you have the knowledge. Get out there and put it to work. Your next perfectly grilled meal is waiting, and you'll know exactly why it turned out great.
— Dr. Claire Whitfield
Frequently Asked Questions
What is the most important heat transfer method for grilling steaks?
Conduction is most critical for developing a proper sear and grill marks on steaks, as direct contact between hot grill grates and meat creates the highest rate of heat transfer. However, for thick steaks, combining initial high-conduction searing with convection-based indirect cooking (reverse-searing) produces the best results—a perfect crust with even internal doneness.
How hot should my grill grates be for optimal searing?
For optimal searing via conduction, aim for grate surface temperatures between 450-550°F, measured with an infrared thermometer. Thin steaks and burgers work best at 450-500°F, while thick steaks benefit from 500-550°F. Above 600°F, you risk excessive charring before internal cooking occurs. Always preheat grates for 10-15 minutes and pat meat dry for maximum heat transfer efficiency.
Should I grill with the lid open or closed?
Lid position determines which heat transfer method dominates. Grill with the lid open for thin, fast-cooking items (burgers, thin steaks, vegetables) where you want maximum conduction and radiation with minimal convection. Close the lid for thick cuts, whole chickens, or anything requiring even heat distribution, as this creates convection currents that cook food from all angles. For thick steaks, many pitmasters sear lid-open, then finish lid-closed.
Why do infrared grills cook faster than standard gas grills?
Infrared grills produce intense radiant heat by heating ceramic or metal emitters to 1000°F+, creating concentrated infrared energy that cooks food directly without needing to heat the surrounding air first. Standard gas grills rely primarily on convection (heating air) and conduction (hot grates), which are less efficient. This radiation-dominant approach can reduce cooking time by 50% or more for high-heat searing applications.
What type of grill grates are best for heat transfer?
Cast iron grates provide superior conduction heat transfer due to higher thermal mass and better heat retention compared to stainless steel. When cold meat contacts a cast iron grate, the temperature drops less dramatically, maintaining efficient heat transfer and creating more pronounced sear marks. However, cast iron requires more maintenance (seasoning, rust prevention). Stainless steel grates are more convenient and durable but produce less aggressive searing.
More Expert Guides
Steak Doneness Temperature Guide: The Science of Every Level from Rare to Well Done
Every degree matters. This science-backed guide covers the exact internal temperatures for every steak doneness level, why each temperature produces a different texture, and how to nail your target every time.
14 min readDirect vs Indirect Heat Grilling: The Science of Two-Zone Cooking
Direct heat sears. Indirect heat roasts. Understanding the physics of each — and when to combine them — is the foundation of every great grilling technique.
14 min readResting Meat After Cooking: The Science of Why It Makes Every Steak Juicier
Resting meat after cooking is not optional — it is physics. Here is exactly what happens inside the steak during those crucial minutes and how long to rest every cut.