How to Control Grill Temperature: The Complete Science Guide
How to Control Grill Temperature: The Complete Science Guide
After years of studying combustion dynamics and heat transfer in outdoor cooking, I can tell you that temperature control is the single most important skill in grilling — and the least understood. Most people treat their grill like an on/off switch. In reality, you're managing a complex thermodynamic system where airflow, fuel geometry, and radiant heat all interact.
Whether you're trying to hold 225°F for a 12-hour brisket or blast 700°F for a 90-second sear on a thick-cut ribeye, the principles are the same. Once you understand the science, temperature swings become predictable — and fixable.
The Combustion Triangle: Why Your Grill Gets Hot
Every fire needs three things: fuel, heat, and oxygen. In grilling, you control temperature primarily by manipulating oxygen — the most responsive variable. More air means more combustion, which means more heat. Less air slows combustion and drops temperature.
This is why vents matter more than the amount of charcoal you use. A small pile of charcoal with wide-open vents can burn hotter than a massive pile with vents nearly closed. The oxygen supply rate dictates the burn rate, and the burn rate dictates temperature.
Vent Physics: Your Primary Temperature Control
Every charcoal grill has two sets of vents: intake vents (bottom) and exhaust vents (top). Understanding how they work together is the foundation of temperature control.
Bottom Vents (Intake)
The bottom vents control how much fresh oxygen reaches the coals. This is your primary temperature adjustment. The relationship is roughly linear up to a point:
- Fully open: Maximum airflow, maximum combustion — temperatures can exceed 700°F
- Half open: Moderate airflow, ideal for 325–400°F medium-heat cooking
- Quarter open: Restricted airflow, perfect for 225–275°F low-and-slow smoking
- Nearly closed: Minimal combustion — used to extinguish coals or hold below 200°F
Top Vents (Exhaust)
The top vent serves a dual purpose: it creates the draft that pulls air through the bottom vents (stack effect), and it evacuates smoke and combustion gases. A critical rule: never fully close the top vent while cooking. Closing the exhaust traps carbon monoxide and creosote-laden smoke, which gives food a bitter, acrid taste.
For most cooking, keep the top vent at least half open. Adjust temperature primarily with the bottom vents. The top vent is your fine-tuning knob — close it slightly to drop 10–15°F, open it more to raise temperature by the same margin.
The Stack Effect
Hot air rises. As combustion gases exit the top vent, they create a partial vacuum that draws fresh air in through the bottom vents. This natural convection loop is called the stack effect, and it's why tall smokers (like vertical bullet smokers) have excellent airflow characteristics even with small vents.
The stack effect also means that wind direction matters. Wind blowing directly into your bottom vents forces extra oxygen into the fire, causing temperature spikes. Position your grill so the intake vents face away from prevailing wind, or use a wind break.
Charcoal Management: Fuel Geometry Matters
The way you arrange charcoal has a profound impact on temperature behavior over time. Here are the four fundamental configurations:
1. The Full Spread
Coals spread evenly across the entire charcoal grate. This produces uniform high heat (450–600°F) but burns out quickly — typically 30–45 minutes of peak heat. Best for: burgers, hot dogs, thin steaks, vegetables.
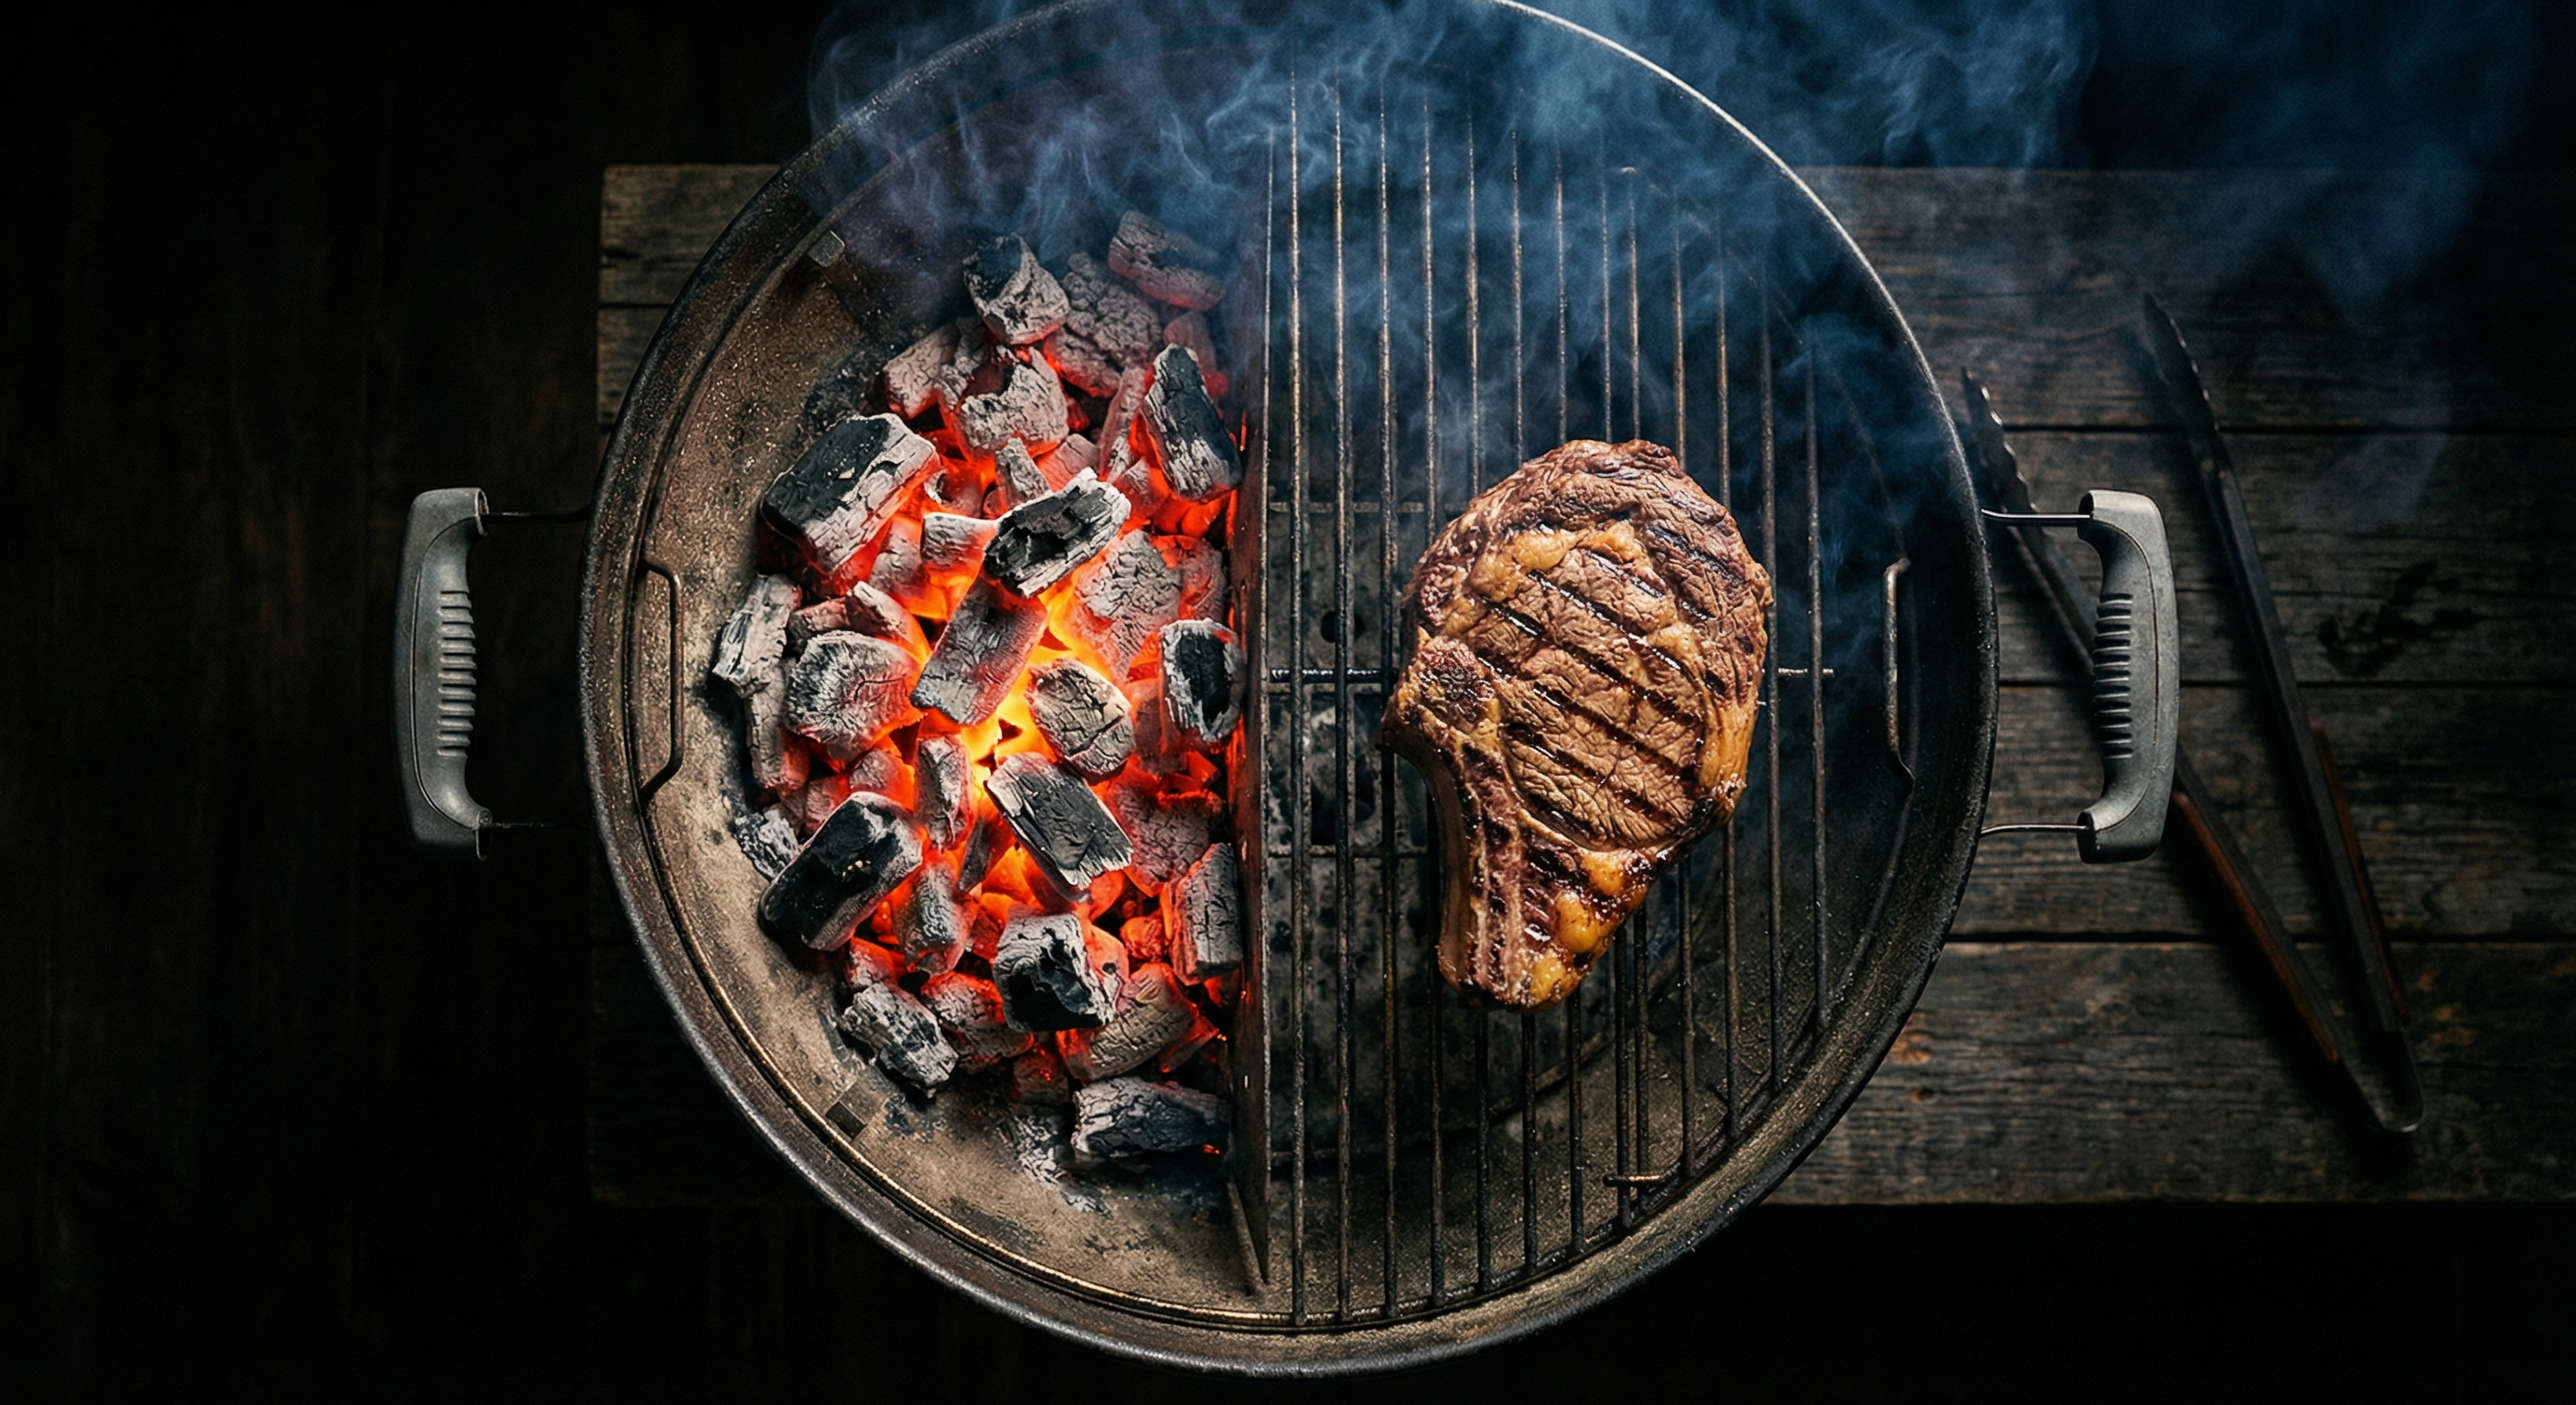
2. The Two-Zone Setup
Coals banked on one side, nothing on the other. This is the most versatile arrangement in all of outdoor cooking. The hot side gives you direct radiant heat for searing (500°F+), while the cool side provides gentle convective heat (300–350°F) for indirect cooking. You can sear a steak then move it to the cool side to finish, or slow-roast a chicken on the indirect side with occasional browning over the coals.
3. The Snake (Fuse) Method
Unlit charcoal arranged in a C-shape around the perimeter, with a small cluster of lit coals at one end. The fire slowly burns along the "snake," providing consistent low heat (225–275°F) for 6–8 hours. This is the budget smoker setup — no fancy equipment needed, just patience and a kettle grill.
For the snake method, use two rows of briquettes, two high. Place wood chunks every 4–6 inches along the snake for smoke flavor. Light 8–10 briquettes in a chimney starter and place them at one end. The fire takes about 30 minutes to stabilize, then holds remarkably steady temperature.
4. The Minion Method
Similar principle to the snake but used in vertical smokers. Fill the charcoal chamber with unlit briquettes, then pour a small amount of fully lit coals on top. The lit coals slowly ignite the unlit ones below, providing 8–12 hours of consistent heat. Temperature control comes entirely from vent adjustment.
Gas Grill Temperature Control
Gas grills trade the nuance of charcoal for convenience and precision. Temperature control is more straightforward but has its own science:
Burner Zones
Most gas grills have 2–4 independently controlled burners. This gives you built-in zone cooking:
- All burners high: Maximum heat for searing (500–600°F)
- One burner high, others off: Two-zone setup for indirect cooking
- All burners low: Gentle heat for warming or slow cooking (250–300°F)
Lid Position
On a gas grill, the lid is your most powerful temperature tool after burner knobs. Lid closed traps convective heat and can add 100–200°F to the cooking environment. Lid open relies on direct radiant heat only, which drops the effective cooking temperature significantly for anything not directly over the flames.
Rule of thumb: cook with the lid closed for anything thicker than ¾ inch. Thinner items (shrimp, asparagus, thin burgers) cook fine with the lid open using direct radiant heat alone.
The Preheat Myth
Many recipes say "preheat grill to high." But preheating to maximum then dialing back is inefficient — the thermal mass of the grates, flavorizer bars, and firebox retains heat long after you lower the burners. Instead, preheat to your target temperature. If you need 400°F, start on medium-high and let the grill stabilize for 10–15 minutes. You'll hit your target faster and more accurately than the blast-and-back-off approach.
Reading Temperature: Where You Measure Matters
The built-in thermometer on your grill lid is lying to you. Not intentionally — but lid-mounted thermometers measure air temperature at the top of the dome, which can be 50–75°F higher than the temperature at grate level where your food actually sits.
Grate-Level Thermometers
For accurate temperature monitoring, place a probe thermometer at grate level, near your food. Dual-probe wireless thermometers let you track both grate temperature and internal meat temperature simultaneously — eliminating guesswork entirely.
The Hand Test (Approximate)
Hold your hand 5 inches above the grate and count seconds until you have to pull away:
- 1–2 seconds: High heat (450°F+)
- 3–4 seconds: Medium-high (375–450°F)
- 5–6 seconds: Medium (325–375°F)
- 7–8 seconds: Medium-low (250–325°F)
- 9+ seconds: Low heat (below 250°F)
This is imprecise but useful when you don't have a thermometer handy. Factors like ambient temperature, wind, and individual pain tolerance introduce variance.
Troubleshooting Temperature Swings
Temperature instability is the most common grilling frustration. Here are the usual culprits and fixes:
Problem: Temperature Spikes After Adding Food
Dripping fat hits the coals or flavorizer bars, causing flare-ups that spike temperature. Fix: Use the two-zone method. Place food on the indirect side for initial cooking, then move to direct heat only for the final sear. This minimizes drip-induced flare-ups during the longest part of the cook.
Problem: Temperature Drops When Opening the Lid
Opening the lid dumps 50–100°F of trapped convective heat instantly. On charcoal grills, the rush of fresh oxygen can then cause a rebound spike. Fix: Minimize lid openings. Use a wireless thermometer to monitor without lifting. When you must open, do everything you need in one quick session — flip, sauce, check, close. The recovery time is 5–10 minutes for charcoal, 2–3 minutes for gas.
Problem: Can't Get Low Enough for Smoking
If your grill runs too hot for low-and-slow, you have too much fuel or too much air. Fix: Use fewer coals (the snake method is ideal for kettle grills), close bottom vents to ¼ open, and place a water pan on the grate. The water pan acts as a thermal ballast — it absorbs excess heat and releases it slowly, dampening temperature fluctuations. A full water pan can reduce grate temperature by 25–50°F.
Problem: Temperature Fading Over Long Cooks
Charcoal is a finite fuel. Over 2+ hour cooks, the fire bed shrinks and temperature drops. Fix: Add pre-lit coals from a chimney starter every 60–90 minutes. Never dump unlit charcoal directly onto the fire — it smothers the existing coals and produces acrid smoke as the new charcoal ignites. Always light new coals separately and add them once they're fully ashed over.
Problem: One Side Hotter Than the Other
Uneven coal distribution or blocked burner ports cause hot spots. Fix: For charcoal, rake coals into an even layer before cooking. For gas, check burner ports for clogs (spider webs are a common culprit in stored grills — spiders love the smell of gas odorant). Clean ports with a thin wire or pipe cleaner.
Advanced Technique: Water Pans as Thermal Ballast
Professional pitmasters use water pans not for moisture (that's a myth) but for thermal regulation. Water has an enormous specific heat capacity — it absorbs a lot of energy before changing temperature. A pan of water on your grill:
- Absorbs excess heat, preventing spikes
- Releases stored heat when the fire dips, preventing drops
- Creates a temperature ceiling near 212°F on the indirect side (water can't exceed its boiling point under normal pressure)
- Adds humidity, which improves smoke adhesion and bark formation
For a standard 22-inch kettle grill, a 9×13-inch aluminum pan filled halfway with hot water is the right size. Place it on the charcoal grate next to (not on top of) the coals.
Temperature Targets: What to Aim For
Different foods need different grill temperatures. Here's a science-based reference:
- 200–250°F: Low-and-slow smoking (brisket, pork shoulder, ribs). Collagen breaks down into gelatin above 160°F, but slowly — you need hours at these temps. See our carryover cooking guide for pull temperatures.
- 325–375°F: Roasting zone. Ideal for whole chickens, thick pork chops, and bone-in cuts that need time for heat to penetrate. The indirect heat method works best here.
- 400–450°F: All-purpose grilling. Burgers, sausages, chicken pieces, vegetables. Hot enough for Maillard browning on surfaces while cooking through without charring.
- 500–600°F: High-heat searing. Steaks, tuna, lamb chops. You're after maximum crust formation via the Maillard reaction in minimum time.
- 650°F+: Infrared searing range. Only achievable with dedicated sear burners, chimney-starter searing, or afterburner setups. Produces steakhouse-quality crust in 60–90 seconds per side.
The 15-Minute Rule
After making any adjustment to vents, burner knobs, or fuel, wait at least 15 minutes before judging the result. Grills have significant thermal inertia — heavy steel grates, ceramic components, and large air volumes all need time to reach equilibrium. Making rapid adjustments because the thermometer hasn't moved after 3 minutes is the most common mistake, leading to overcorrection and wild temperature oscillations.
Think of it like a thermostat in your house. You don't crank the heat to 90°F because the room hasn't warmed up after 5 minutes. Set your vents, walk away, come back in 15 minutes and read the temperature. Then make small adjustments and wait again.
Putting It All Together: A Temperature Control Checklist
- Choose your fuel arrangement based on cook time and target temperature
- Light charcoal in a chimney starter — never use lighter fluid (it introduces chemical flavors and makes temperature unpredictable)
- Set vents to your starting position before adding food
- Wait 15 minutes for temperature to stabilize
- Place a grate-level thermometer where you'll be cooking
- Add food only when the target temperature is stable (±10°F for 5 minutes)
- Make small vent adjustments — ¼ inch at a time on the bottom vent
- Minimize lid openings — every peek costs 5–10 minutes of recovery
- Add lit coals every 60–90 minutes for long cooks
- Monitor, don't react — patience is the ultimate temperature control tool
Temperature control isn't a talent — it's a skill built on understanding physics. The combustion triangle, vent aerodynamics, and thermal mass are all predictable, repeatable science. Once you internalize these principles, you'll spend less time fighting your grill and more time enjoying perfect results.
Frequently Asked Questions
How do I keep my grill at 225°F for smoking?
Use the snake method or Minion method with charcoal, keep bottom vents at about quarter open, top vent half open, and add a water pan as thermal ballast. Make small vent adjustments and wait 15 minutes between changes.
Why does my grill temperature spike when I open the lid?
Opening the lid introduces a rush of fresh oxygen to the coals, temporarily increasing combustion. The initial drop from lost convective heat is followed by a rebound spike. Minimize lid openings and use a wireless thermometer to monitor without lifting.
Should I control temperature with the top or bottom vent?
Use the bottom (intake) vent as your primary temperature control — it regulates oxygen flow to the fire. Keep the top (exhaust) vent at least half open to maintain proper draft and avoid trapping bitter smoke. Use the top vent only for fine-tuning (±10-15°F).
How long should I preheat my grill?
Preheat for 10-15 minutes with the lid closed at your target temperature. Don't preheat to maximum then dial back — the thermal mass retains heat and you'll overshoot. Stabilize at your target temp before adding food.
How do I control temperature on a gas grill?
Use burner knobs for coarse adjustment and lid position for fine-tuning. Lid closed adds 100-200°F of convective heat. For two-zone cooking, turn one burner to high and leave others off. Preheat to target temperature, not maximum.
More Expert Guides
Steak Doneness Temperature Guide: The Science of Every Level from Rare to Well Done
Every degree matters. This science-backed guide covers the exact internal temperatures for every steak doneness level, why each temperature produces a different texture, and how to nail your target every time.
14 min readDirect vs Indirect Heat Grilling: The Science of Two-Zone Cooking
Direct heat sears. Indirect heat roasts. Understanding the physics of each — and when to combine them — is the foundation of every great grilling technique.
14 min readResting Meat After Cooking: The Science of Why It Makes Every Steak Juicier
Resting meat after cooking is not optional — it is physics. Here is exactly what happens inside the steak during those crucial minutes and how long to rest every cut.