The Science of Grilling Tri-Tip: Why This Cut Demands Two-Zone Mastery
The tri-tip is a paradox. It is one of the most flavorful cuts on the animal, yet it confounds backyard grillers more than almost any other piece of beef. The reason is structural: tri-tip is a single muscle with a tapered geometry, variable thickness, and a grain direction that changes across the cut. Cook it wrong, and you get shoe leather on one end and raw meat on the other.
But if you understand the physics at play—heat transfer through tapered geometry, collagen behavior at moderate temperatures, and the biomechanics of muscle fiber orientation—tri-tip becomes one of the most rewarding cuts you will ever grill. Let me show you why.
Anatomy of the Tri-Tip: The Tensor Fasciae Latae
The tri-tip comes from the bottom sirloin subprimal, specifically the tensor fasciae latae muscle. It is a triangular-shaped muscle that sits at the junction of the sirloin and the round, positioned at the base of the animal's hip. This location matters because it tells us exactly what kind of muscle we are dealing with.
Unlike a ribeye (which comes from a relatively sedentary section of the animal), the tri-tip is a locomotion muscle. It helps the animal walk and stabilize its rear legs. This means the muscle fibers are denser, the connective tissue is more developed, and the grain structure is more pronounced. The marbling score on a typical USDA Choice tri-tip runs between BMS 3-5—enough fat to stay juicy, but not enough to compensate for overcooking.
The critical structural challenge is the taper. A typical tri-tip ranges from 2.5 inches thick at the heel (the wide base of the triangle) down to barely ¾ inch at the tip. This creates a differential cooking problem that demands a scientific approach to heat management.
The Two-Zone Imperative: Managing Thermal Gradients
When you place any piece of meat on a grill, heat transfers into the protein through three mechanisms simultaneously: conduction (from the grate), convection (from the hot air), and radiation (from the coals or burners). The rate of temperature change at any point in the meat is governed by Fourier's Law of heat conduction, which tells us that thicker sections take disproportionately longer to reach temperature.
For a uniform steak, this is manageable. For a tri-tip with a 3:1 thickness ratio from heel to tip, it is catastrophic under single-zone direct heat. By the time the thick heel reaches 130°F internally, the thin tip has soared past 165°F—well into the gray, dry, unpleasant territory where myosin proteins have fully denatured and expelled their bound water.
The solution is two-zone grilling. By creating a hot zone (direct heat, 450-500°F) and a cool zone (indirect heat, 275-325°F), you can position the thick heel closer to the heat source and the thin tip further away. This compensates for the geometric taper with a corresponding thermal gradient.
The optimal setup: Position the tri-tip diagonally across the zones, with the thick heel over direct heat and the thin tip extending into the indirect zone. Rotate 90° at the halfway point to develop even bark. This simple spatial adjustment is the single most important variable in tri-tip success.
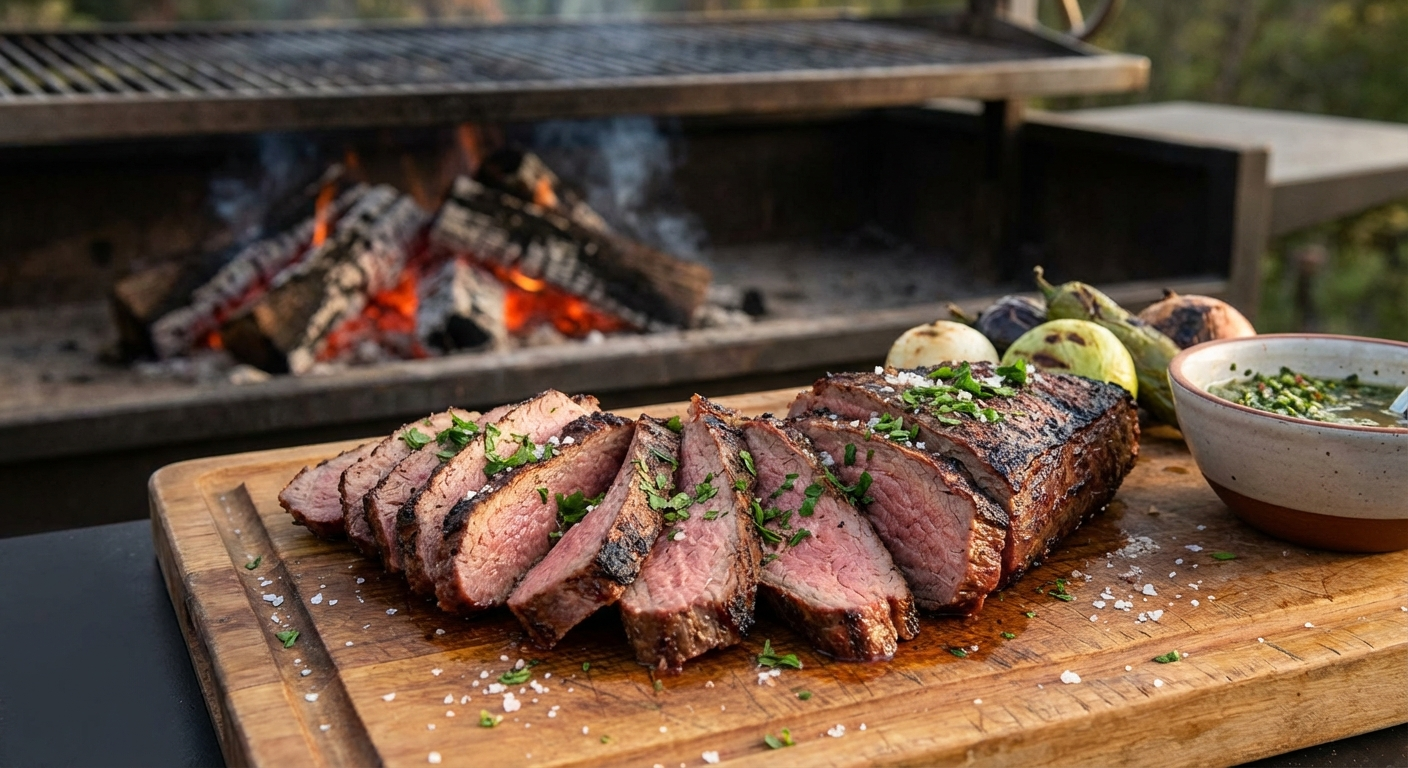
The Santa Maria Method: Red Oak and Radiant Heat
No discussion of tri-tip science is complete without addressing its origin. The Santa Maria Valley in California's Central Coast is ground zero for tri-tip grilling, and the traditional method reveals some sophisticated thermal engineering disguised as cowboy simplicity.
The Santa Maria grill uses an adjustable grate suspended over a bed of red oak coals. The grate can be raised or lowered via a hand crank, giving the pitmaster precise control over the radiant heat flux hitting the meat. This is essentially a manual thermostat: lower the grate for higher heat, raise it to reduce intensity.
Red oak is the traditional fuel for good reason. It burns at approximately 900°F with a relatively consistent heat output and produces a clean, medium-intensity smoke. Unlike hickory or mesquite, red oak does not deposit heavy phenolic compounds that can turn bitter on a long cook. For a cut that spends 30-45 minutes over fire, this restraint is critical.
The Santa Maria seasoning is equally scientific in its simplicity: salt, pepper, garlic powder, and sometimes dried parsley. The salt drives osmotic moisture to the surface during the pre-seasoning rest, which then evaporates in the first minutes of grilling, creating a dry surface for Maillard browning. The coarse black pepper contributes piperine, which has been shown to enhance flavor perception at the receptor level.
Internal Temperature Targets and Protein Denaturation
Tri-tip occupies a narrow window of optimal doneness, and the science of protein denaturation explains why. The key proteins in beef muscle denature at specific temperatures:
- Myosin: Begins denaturing at 122°F, complete by 140°F. This is the primary structural protein; its denaturation determines "doneness."
- Collagen: Begins contracting at 140°F, converts to gelatin above 160°F (but requires time). In a tri-tip cook of 30-45 minutes, you will not achieve meaningful collagen conversion.
- Actin: Denatures at 150°F+. When actin denatures, it squeezes water out of the muscle fibers irreversibly. This is the "well-done" threshold, and it is why tri-tip becomes dry and chewy above 145°F internal.
Because tri-tip lacks sufficient collagen for low-and-slow conversion (unlike brisket), and lacks sufficient marbling to mask overcooking (unlike ribeye), you must hit the sweet spot between myosin denaturation and actin destruction. That window is 130°F to 140°F—medium-rare to medium.
Account for carryover cooking of 5-8°F (tri-tip's density and mass create more carryover than a thin steak), and your pull temperature should be 125°F for medium-rare or 132°F for medium.
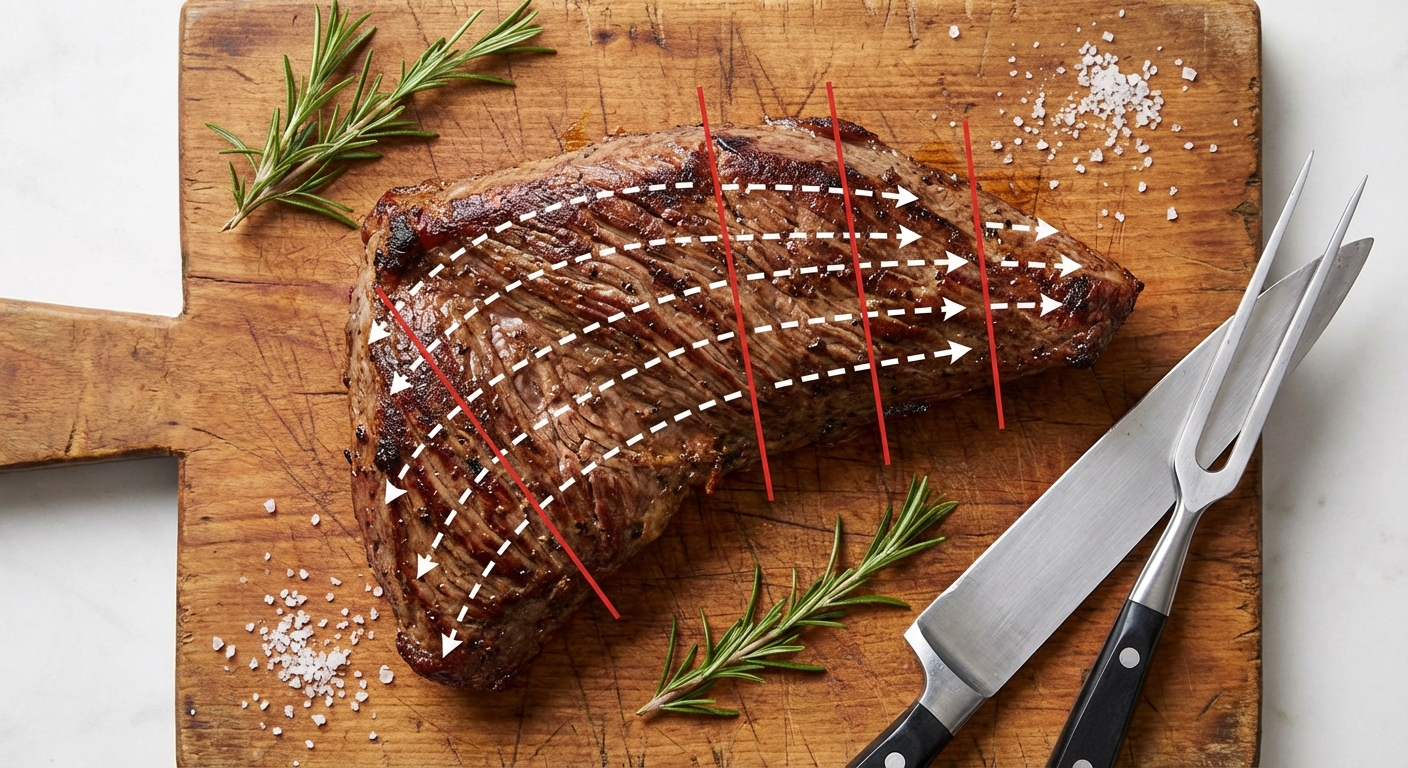
Grain Direction: The Slicing Variable
Here is where tri-tip confounds even experienced grillers. Most cuts have a single, consistent grain direction. You identify the grain, rotate 90°, and slice perpendicular. Simple.
Tri-tip has two distinct grain directions that converge near the center of the cut. The fibers in the thick heel run roughly perpendicular to the fibers in the thin tip, meeting at an angle near the middle. If you slice the entire tri-tip in one direction, half of it will be cut with the grain—resulting in tough, chewy slices regardless of how perfectly you cooked it.
The solution is to cut the tri-tip in half through the approximate midpoint where the grain changes direction, then slice each half separately against its own grain. This yields uniformly tender slices from both sections. It is not intuitive, which is why so many people think tri-tip is inherently tough. It is not tough. It is just incorrectly sliced.
For maximum tenderness, slice against the grain at a slight bias (about 20° off perpendicular). This shortens the muscle fibers in each slice even further, reducing the chewing resistance. Slice thickness should be ¼ inch—thin enough to be tender, thick enough to retain juiciness.
The Reverse Sear Adaptation for Tri-Tip
While the traditional Santa Maria method is a direct-heat approach, the reverse sear offers significant advantages for tri-tip specifically because of the taper problem.
Start the tri-tip entirely on the indirect zone at 250°F. The low, even heat minimizes the temperature differential between the thick and thin ends. Monitor internal temperature at the thickest point. When it reaches 115°F, move the entire tri-tip to direct heat for a 2-3 minute sear per side.
This method produces a more even doneness from heel to tip compared to the traditional approach. The trade-off is a slightly less developed bark, since the total time over direct heat is reduced. For grillers who prioritize uniform doneness over maximum crust, the reverse sear adaptation is the scientifically superior method.
For those who want both—maximum bark AND uniform doneness—combine the approaches. Start indirect at 250°F until 110°F internal, then finish with a direct sear at the highest possible temperature. The surface dehydration from the indirect phase ensures rapid Maillard development during the sear, similar to the mechanism that makes the reverse sear so effective on thick steaks.
Resting: The Final Thermal Equalization
Resting tri-tip is not optional. During cooking, the intense surface heat creates a moisture gradient: the outer layers are drier, the inner layers are wetter. Cutting immediately releases the pressurized juices from the interior before they can redistribute.
The science of resting shows that as the meat cools, the viscosity of the melted fat and denatured protein gel increases, trapping the moisture within the muscle fibers. For tri-tip, a 10-15 minute rest is optimal. Tent loosely with foil to slow heat loss without trapping steam (which would soften the bark).
During this rest, carryover cooking will push the internal temperature up 5-8°F. If you pulled at 125°F, you will finish at 130-133°F—a perfect medium-rare. This predictable carryover is why accurate thermometer readings and disciplined pull temperatures matter so much with this cut.
Common Mistakes and Their Scientific Explanations
- Cooking to well-done: Actin denaturation above 150°F squeezes moisture irreversibly. Tri-tip lacks the collagen and fat to compensate. The result is dry, tough meat that no amount of sauce can save.
- Single-zone direct heat: The taper guarantees overcooking the tip before the heel is done. Always use two zones or reverse sear.
- Slicing with the grain: The dual grain direction is the number one reason people dislike tri-tip. Always identify both grain directions and slice each half separately.
- Skipping the rest: Cutting immediately loses up to 10% of the total moisture content. That is the difference between juicy and dry.
- Over-smoking: Tri-tip is not brisket. It spends 30-45 minutes on the grill, not 12 hours. Heavy smoke woods overwhelm the beef flavor in that timeframe. Use mild to medium woods: red oak, cherry, or pecan.
Putting It All Together: The Complete Protocol
- Select: Look for a 2-3 lb tri-tip, USDA Choice or higher, with visible marbling and an even fat cap on one side.
- Season: Apply coarse salt, black pepper, and garlic powder at least 40 minutes before grilling (or overnight in the refrigerator). This allows salt to penetrate via osmosis and diffusion.
- Set up two zones: Hot side at 450-500°F, cool side at 275-325°F.
- Grill: Place fat cap up, thick heel toward direct heat, thin tip toward indirect. Cook with the lid closed for convective heat. Flip every 8-10 minutes. Insert a probe thermometer into the thickest section.
- Pull at 125°F for medium-rare (or 132°F for medium).
- Rest: 10-15 minutes, tented loosely with foil.
- Slice: Cut in half at the grain change point. Slice each half against the grain on a 20° bias, ¼ inch thick.
When you understand the physics behind tri-tip—the taper geometry, dual grain structure, narrow doneness window, and resting dynamics—it transforms from a frustrating cut into one of the most satisfying things you can put on a grill. The science does not make it complicated. It makes it predictable. And predictability is the foundation of great grilling.
Frequently Asked Questions
What temperature should I pull tri-tip off the grill?
Pull at 125°F internal for medium-rare or 132°F for medium, measured at the thickest point. Carryover cooking will add 5-8°F during the rest period. Tri-tip becomes noticeably dry and tough above 145°F internal because actin proteins denature and expel moisture irreversibly at that threshold.
Why does tri-tip have two grain directions?
The tri-tip is a triangular muscle (tensor fasciae latae) where the muscle fibers converge from different angles near the center. The thick heel end and the thin tip end have fibers running in different directions. To ensure tender slices, cut the tri-tip in half at the grain change point and slice each half separately against its own grain.
Can I smoke a tri-tip like brisket?
Not effectively. Brisket benefits from 10-14 hours of low-and-slow cooking because it contains abundant collagen that converts to gelatin over time. Tri-tip has minimal collagen, so extended smoking dries it out without the payoff of rendered connective tissue. Keep tri-tip cook times to 30-45 minutes with mild smoke wood like red oak or cherry.
Should I sear tri-tip first or reverse sear?
For tri-tip specifically, the reverse sear (starting indirect, finishing with a direct sear) produces more even doneness from the thick heel to the thin tip. The traditional direct-heat method creates better bark but risks overcooking the thin end. For best results, start indirect at 250°F until 110-115°F internal, then finish with a high-heat sear for 2-3 minutes per side.
What is the best wood for grilling tri-tip?
Red oak is the traditional and scientifically sound choice. It burns cleanly at around 900°F with medium smoke intensity, imparting flavor without the bitter phenolic compounds that heavier woods like mesquite or hickory can deposit during a shorter cook. Cherry and pecan are also excellent alternatives for mild, complementary smoke.
More Expert Guides
Water Pan in a Smoker: The Science of Humidity, Heat Regulation & Better BBQ
A water pan does far more than add moisture. It stabilizes temperature, improves smoke adhesion, and changes how bark forms. Here is the thermodynamics behind every drop.
13 min readThe Science of Perfect Grilled Chicken Breast: Why Yours Keeps Drying Out
Chicken breast is the most overcooked protein in America. The science of why it dries out — and exactly how to prevent it — comes down to protein denaturation, moisture retention, and thermal management.
14 min readLow and Slow vs Hot and Fast BBQ: The Science of When Each Method Wins
Two schools of barbecue. One cooks brisket at 225°F for 14 hours. The other cranks to 325°F and finishes in 6. Both produce championship-caliber results — but the physics behind each method are completely different.