The 3-2-1 Ribs Method: The Science Behind Perfect Smoked Ribs Every Time
The 3-2-1 Ribs Method: The Science Behind Perfect Smoked Ribs Every Time
Ask any backyard pitmaster how they smoke ribs, and there is a good chance they will say "3-2-1." Three hours of smoke, two hours wrapped, one hour sauced and unwrapped. It is the most widely taught method in barbecue, and it works — but almost nobody can explain why it works.
The 3-2-1 method is not arbitrary. Each phase targets a specific physical and chemical process happening inside the meat at that temperature and time window. Understanding those processes lets you adapt the method to any smoker, any weather, and any personal preference — instead of following the numbers blindly and hoping for the best.
What Is the 3-2-1 Method?
The 3-2-1 method breaks a 6-hour cook into three distinct phases, all at a steady smoker temperature of 225–250°F:
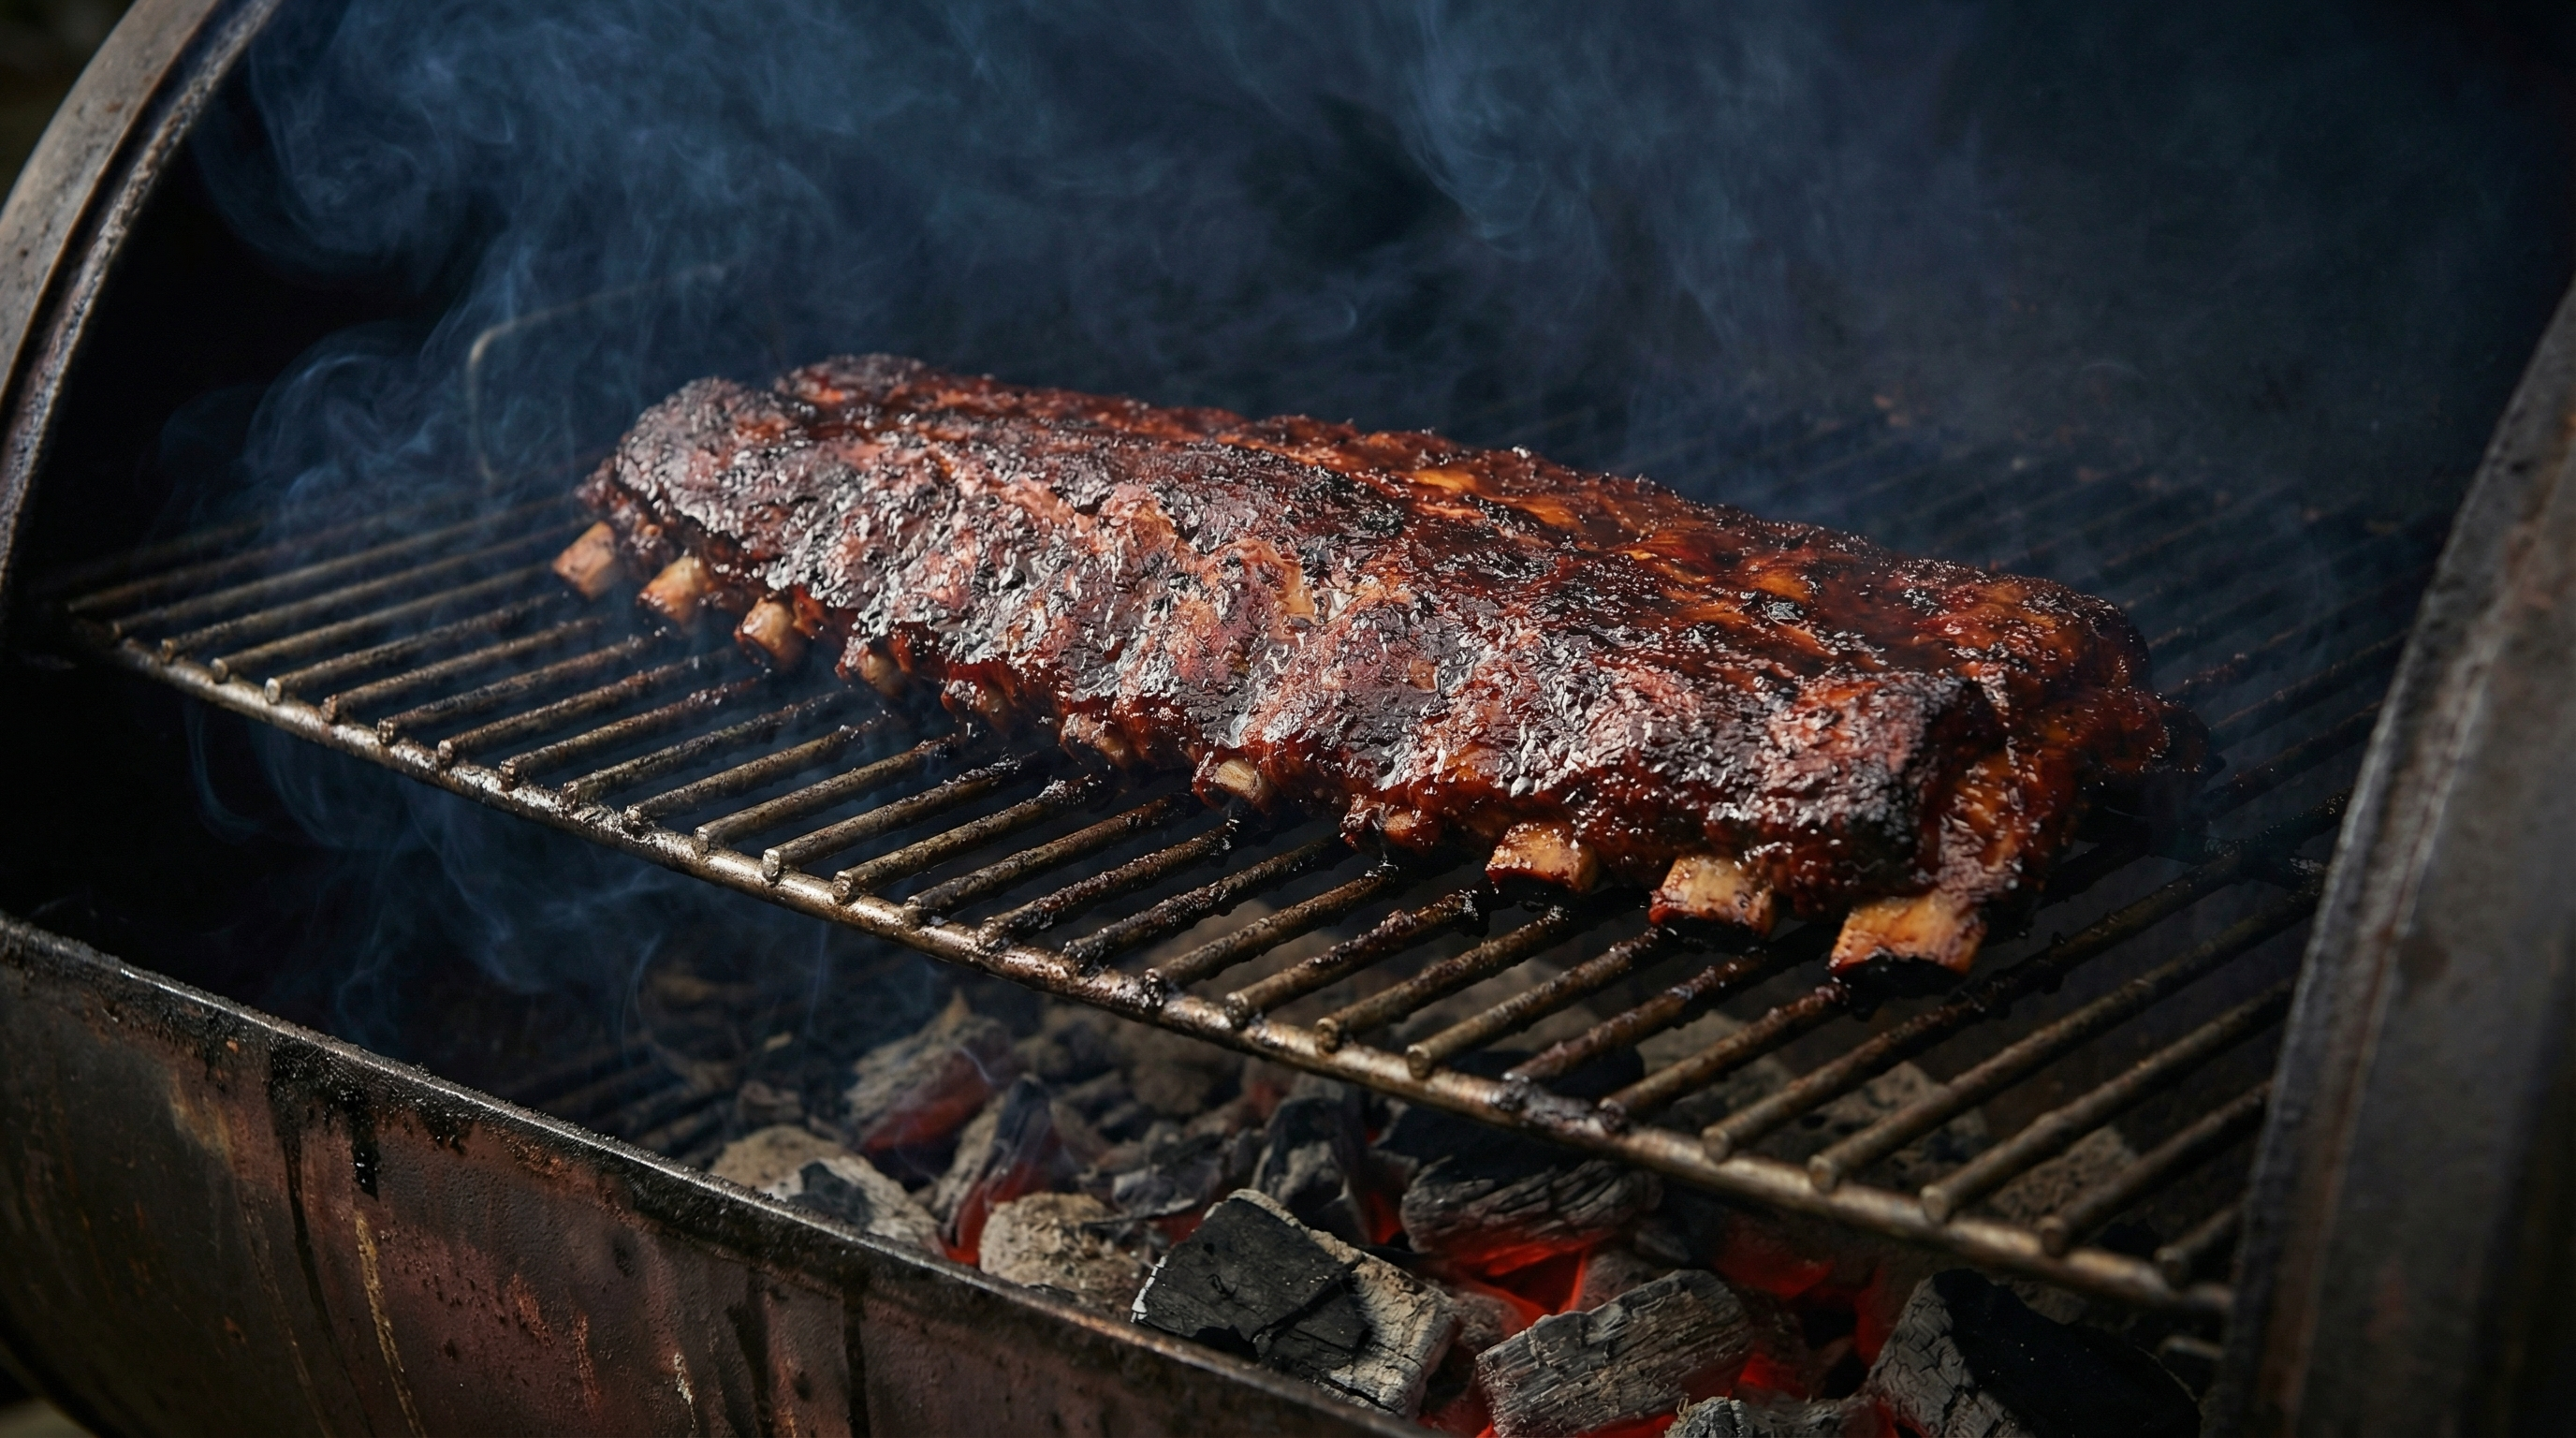
- Phase 1 (3 hours): Ribs sit directly on the smoker grate, bone-side down, exposed to smoke and dry heat.
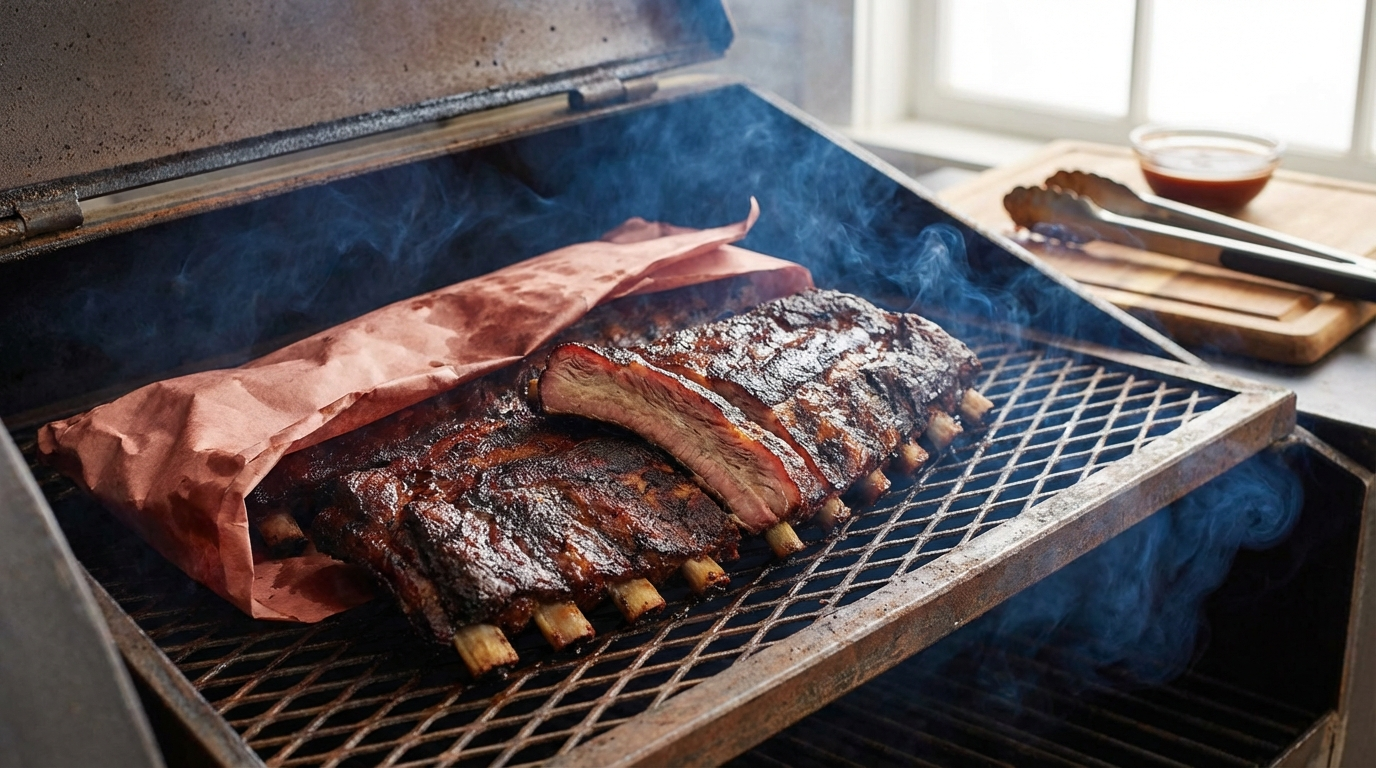
- Phase 2 (2 hours): Ribs are wrapped tightly in foil or butcher paper with a small amount of liquid, creating a moist braising environment.
- Phase 3 (1 hour): Ribs are unwrapped, sauced, and returned to the smoker to set the glaze and firm up the bark.
The total cook time is 6 hours. The method was originally developed for pork spare ribs — the larger, fattier cut from the belly side of the rib cage. Baby back ribs, which are leaner and thinner, need a modified timing (more on that below).
Phase 1: The Smoke Phase (3 Hours) — Bark Formation and Smoke Absorption

The first three hours accomplish two critical goals: bark formation and smoke flavor absorption. Both are time-sensitive — and both become impossible once you wrap the meat.
Bark Formation: The Maillard Reaction on Slow Motion
Bark is the dark, flavorful crust that forms on the exterior of smoked meat. It is the product of the Maillard reaction — the same browning chemistry that sears a steak, but happening over hours instead of minutes at lower temperatures.
At 225–250°F, the surface of the ribs slowly dehydrates. As moisture evaporates, the surface temperature climbs above 212°F and enters the Maillard zone (280°F+). The dry rub ingredients — sugar, salt, paprika, garlic powder, black pepper — interact with the proteins in the meat surface to form hundreds of new flavor compounds. The sugar caramelizes. The spices toast. The Maillard products accumulate layer by layer into a firm, dark crust.
This process requires a dry surface and airflow. Once you wrap the ribs in Phase 2, the surface becomes wet and the bark stops developing. That is why the smoke phase comes first — you are building bark while the conditions allow it.
Smoke Absorption: A Surface Phenomenon
Wood smoke contains hundreds of volatile organic compounds, but the ones that matter most for flavor are syringol and guaiacol — phenolic compounds responsible for that characteristic smoky taste. These compounds are absorbed by the wet surface of the meat during the first 2–3 hours of cooking.
As the surface dries out (from both evaporation and bark formation), smoke absorption slows dramatically. By the end of the three-hour smoke phase, the ribs have absorbed nearly all the smoke flavor they are going to get. Wrapping them does not cost you smoke flavor — the window has already closed naturally.
This is also why wood selection matters most in Phase 1. Hickory, cherry, apple, and oak each deliver different phenolic profiles. Hickory is the classic choice for pork ribs — assertive, bacon-like smoke. Cherry adds a subtle sweetness and mahogany color. Apple is milder. Use wood chunks or splits, not chips — they burn more slowly and produce cleaner smoke over the full three hours.
What Is Happening Inside the Meat
During Phase 1, the internal temperature of the ribs climbs from refrigerator temperature (38–40°F) to roughly 150–165°F. Several important transformations begin:
- Myoglobin denaturation (100–140°F): The protein that gives raw pork its pink color begins to unfold and change, shifting the meat's color from pink to pale gray.
- Collagen contraction begins (140°F+): The connective tissue between muscle fibers — mostly Type I and Type III collagen — starts to tighten. This is the stage where ribs feel tough if you were to eat them now.
- Fat rendering begins (130–140°F): Intramuscular fat starts to soften and liquify, contributing to moisture and flavor.
At the end of Phase 1, your ribs have great color, solid bark, deep smoke flavor — but they are still tough. The collagen has not yet converted to gelatin. That is what Phase 2 is for.
Phase 2: The Wrap Phase (2 Hours) — Collagen Conversion and the Stall
Phase 2 is where the magic happens — where tough connective tissue transforms into silky gelatin, and the ribs go from chewy to tender. Wrapping is not just about speeding up the cook; it fundamentally changes the cooking environment.
Why Wrap? Breaking Through the Stall
Around 150–170°F, large cuts of meat hit the BBQ stall — a temperature plateau caused by evaporative cooling. Moisture on the meat's surface evaporates at exactly the same rate as heat enters the meat, and the temperature flatlines. For a brisket, the stall can last 4–6 hours. For ribs, it is shorter but still significant — potentially adding 1–2 hours to the cook.
Wrapping eliminates the stall by stopping evaporation. When you seal the ribs in foil (or butcher paper, which slows evaporation rather than stopping it completely), the surface moisture has nowhere to go. The evaporative cooling mechanism shuts down, and the internal temperature resumes climbing.
This is the same principle behind the Texas Crutch used for brisket. It is thermodynamics, not a shortcut.
Collagen to Gelatin: The Tenderness Transformation
Pork spare ribs contain significant connective tissue — the membranes, tendons, and collagen networks that hold the meat to the bone. This collagen is what makes ribs tough when undercooked. But collagen has a remarkable property: when held at temperatures above 160°F for a sustained period, it converts to gelatin.
Gelatin is the silky, lip-coating substance that makes great ribs feel rich and succulent. The conversion happens through a process called hydrolysis — water molecules break the triple-helix structure of collagen into individual gelatin strands. This process is both temperature-dependent and time-dependent:
- 160–170°F: Conversion begins slowly. At these temperatures, it takes many hours for significant collagen breakdown.
- 180–195°F: The sweet spot. Collagen converts to gelatin at a practical rate. This is the target internal temperature range for the wrap phase.
- 200°F+: Conversion is rapid, but muscle fibers also contract aggressively, squeezing out moisture. Overshoot this range and you get dry, mushy ribs.
The wrap phase's two-hour window is calibrated to hold the ribs in the 170–195°F range long enough for thorough collagen conversion. The moist environment inside the wrap also helps — gelatin conversion is a hydrolysis reaction, and the added liquid (apple juice, butter, honey, or a combination) provides water molecules to fuel the process.
What to Add Inside the Wrap
Most pitmasters add a splash of liquid before sealing the wrap. Common additions include:
- Apple juice or apple cider vinegar: Adds sweetness, acidity, and moisture. The acid also helps break down connective tissue.
- Butter: Adds richness and fat-soluble flavor compounds. The butter melts and bastes the ribs continuously during the wrap phase.
- Brown sugar or honey: Adds caramelization and sweetness. The sugar dissolves in the liquid and creates a glaze on the meat surface.
- Hot sauce: Adds heat and acidity without overwhelming the smoke flavor.
A classic combination: 2 tablespoons butter, a drizzle of honey, and a splash of apple juice per half-rack. Lay the ribs meat-side down on the foil, add the liquid, and seal tightly. The ribs effectively braise in their own juices plus your added liquid for two hours.
Foil vs. Butcher Paper
Foil creates a completely sealed environment — zero moisture loss, maximum braising effect. This produces the tenderest ribs but can soften the bark you built in Phase 1. The bark gets wet and loses its firm texture.
Butcher paper (uncoated pink paper) is semi-permeable — it slows evaporation but allows some moisture to escape. The result is slightly less tender ribs but better bark preservation. The bark stays firmer because it is not sitting in liquid for two hours.
For spare ribs, foil is the traditional choice (the bark firms back up in Phase 3). For baby backs, where tenderness is less of an issue, butcher paper gives better texture.
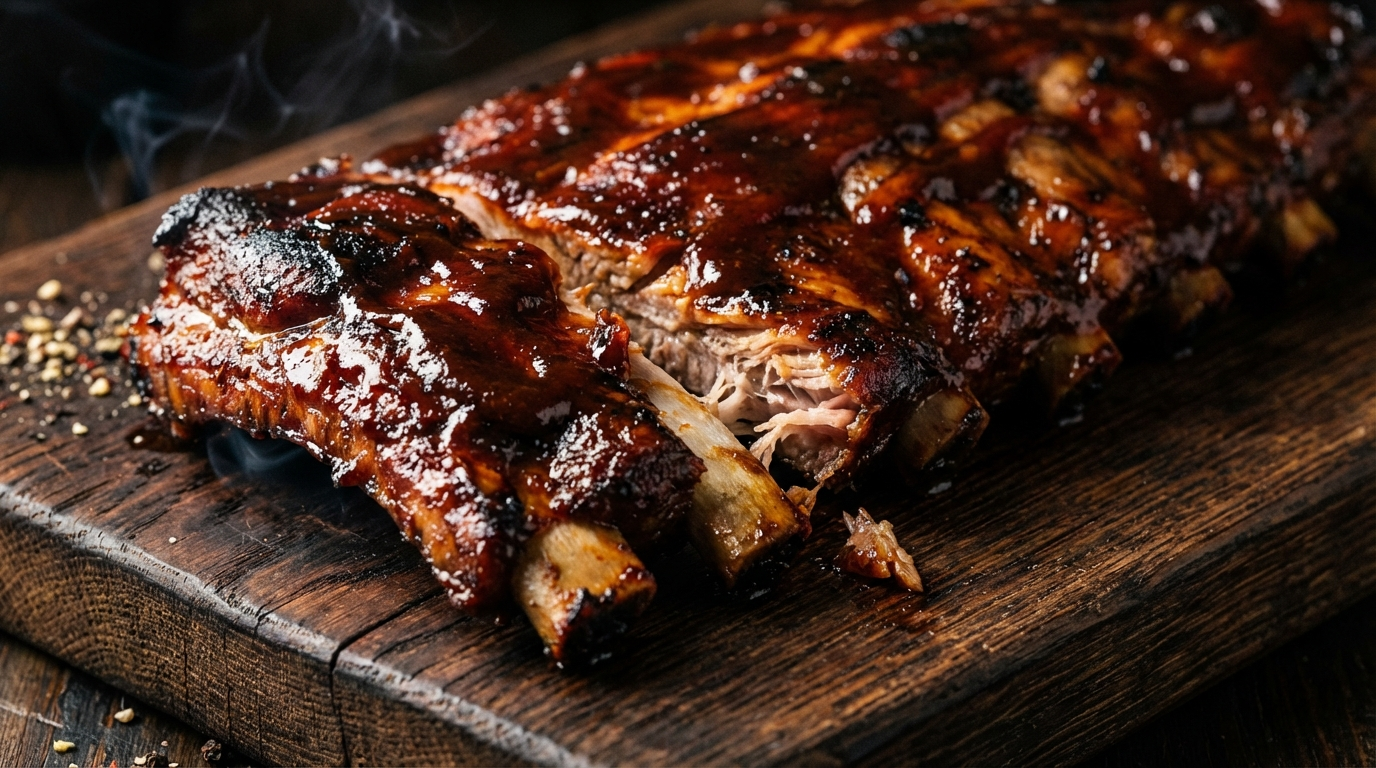
Phase 3: The Glaze Phase (1 Hour) — Sauce Set and Bark Recovery
Phase 3 serves two purposes: setting the glaze and recovering the bark. After two hours in a moist wrap, the surface of the ribs is wet and the bark has softened. The final hour of dry heat reverses this.
Sauce Caramelization
When you apply BBQ sauce to the unwrapped ribs and return them to the smoker, the sugars in the sauce undergo caramelization at the smoker's 225–250°F temperature. This creates a sticky, lacquered finish that clings to the bark. Multiple thin layers work better than one thick coat — apply sauce, let it tack up for 20 minutes, then apply again.
The science is straightforward: sugars in the sauce (high-fructose corn syrup, brown sugar, molasses, tomato sugars) caramelize starting around 320°F. But the surface of the ribs, now dehydrated again by the dry smoker heat, reaches caramelization temperatures even though the air temperature is only 225–250°F. The thin sauce layer heats faster than the bulk of the meat beneath it.
Bark Recovery
The dry heat of the smoker evaporates the moisture that accumulated on the surface during the wrap phase. Within 30–45 minutes, the bark firms back up — not to its pre-wrap crispness, but to a satisfying texture that provides contrast to the tender interior.
If you used butcher paper instead of foil in Phase 2, the bark will recover faster and firmer in Phase 3, because it was never fully saturated.
Temperature Targets and Doneness
The internal temperature of perfectly done ribs should be 195–205°F when measured between the bones in the thickest part of the rack. At this temperature:
- Collagen has fully converted to gelatin
- Fat has fully rendered
- The meat is tender enough to pull cleanly from the bone with a gentle tug — but does not fall off the bone from its own weight
There is an important distinction here: "fall off the bone" ribs are actually overcooked in competition barbecue circles. Properly cooked ribs should show a clean bite mark — when you bite into the rib, the meat separates cleanly from that bone but the rest of the meat stays attached. This is called the "tug test." If the meat falls off before you bite, the collagen has converted too far and the muscle fibers have lost too much moisture.
That said, many home cooks prefer the fall-off-the-bone texture. If that is you, extend Phase 2 by 30 minutes. Just understand you are trading moisture for tenderness.
Adapting the 3-2-1 for Baby Back Ribs: The 2-2-1 Method
Baby back ribs are cut from the top of the rib cage, near the spine. They are shorter, leaner, and have less connective tissue than spare ribs. This means they need less time to reach tenderness — and using the full 3-2-1 timing will overcook them.
The standard adaptation is 2-2-1:
- Phase 1: 2 hours of smoke (baby backs dry out faster — they have less fat to protect them)
- Phase 2: 2 hours wrapped (collagen content is lower, so this is still sufficient)
- Phase 3: 1 hour unwrapped with sauce (same as spare ribs)
Total cook time: 5 hours. Some pitmasters go even shorter — 2-1.5-0.5 — for baby backs that are very small or thin. The key is watching the internal temperature and the bend test (more below) rather than the clock.
How to Tell When Ribs Are Done
Temperature is the primary indicator, but ribs have a visual and tactile test that experienced pitmasters rely on:
The Bend Test
Pick up the rack from the center with tongs. If the ribs bend sharply and the bark starts to crack on the surface, they are done. If the rack stays relatively stiff, they need more time. If the rack folds in half and threatens to break apart, they are overcooked.
The Toothpick Test
Slide a toothpick or probe into the meat between two bones. It should slide in with the resistance of warm butter — smooth but not zero resistance. If it catches or requires pressure, the collagen has not fully converted. If there is literally no resistance, you have overcooked.
Bone Pullback
As ribs cook, the meat shrinks away from the bone tips. A quarter-inch to half-inch of exposed bone is typical for properly cooked ribs. More than half an inch suggests overcooking.
Common Mistakes and How to Fix Them
Mistake 1: Smoker Temperature Too High
The 3-2-1 timing assumes 225–250°F. At 275°F, you will overshoot — the phases happen faster than the clock suggests. If you run a hotter smoker, reduce each phase proportionally. At 275°F, try 2.5-1.5-1.
Mistake 2: Wrapping Too Tight (or Too Loose)
The foil wrap should be snug but not vacuum-sealed. Too tight and you crush the bark. Too loose and steam escapes, defeating the purpose of wrapping. Two layers of heavy-duty foil, crimped firmly at the edges, is the standard.
Mistake 3: Skipping the Membrane
The peritoneum membrane on the bone side of spare ribs is a tough, rubbery sheet that does not render or become tender during cooking. It blocks smoke absorption and rub penetration. Remove it before cooking: slide a butter knife under the membrane at one end, grip it with a paper towel, and peel it off in one sheet.
Mistake 4: Too Much Smoke
Ribs have a large surface-area-to-mass ratio compared to brisket. They absorb smoke quickly. Using too much wood — or wood that burns dirty (thick white smoke instead of thin blue smoke) — produces bitter, acrid ribs. Use 2–3 fist-sized chunks for the entire cook. Thin blue smoke is the target.
Mistake 5: Saucing Too Early
Applying sauce during Phase 1 or Phase 2 prevents bark formation (the wet surface cannot reach Maillard temperatures) and the sugars burn during the long cook. Sauce goes on in Phase 3 only — during the last hour.
The Science of Wood Selection for Ribs
Different wood species produce different concentrations of syringol and guaiacol — the primary smoke flavor compounds. For pork ribs, the best choices are:
- Hickory: High in both syringol and guaiacol. Assertive, bacon-like smoke. The classic choice for spare ribs. Can become bitter if overused.
- Cherry: Moderate syringol, lower guaiacol. Mild, slightly sweet smoke with a beautiful mahogany color contribution. Excellent blended 50/50 with hickory.
- Apple: Low to moderate in both compounds. Very mild, fruity smoke. Good for baby backs where you want subtlety.
- Oak: Balanced profile, moderate intensity. A "neutral" smoke that works with any rub or sauce. The default in Texas barbecue.
- Mesquite: Very high in guaiacol. Intense, earthy smoke. Use sparingly with ribs — it can overpower quickly. Better for short cooks like fajitas than 6-hour smokes.
Putting It All Together: Step-by-Step 3-2-1 Spare Ribs
Prep (30 minutes before)
- Remove the membrane from the bone side of the spare ribs.
- Apply a thin layer of yellow mustard (the binder — it burns off during cooking and leaves no mustard flavor).
- Season generously with your dry rub on all sides. Let the rub adhere for 15–30 minutes at room temperature.
- Start your smoker and stabilize at 225–250°F. Add 2–3 chunks of hickory or cherry wood.
Phase 1: Smoke (3 Hours)
- Place ribs bone-side down on the smoker grate.
- Close the lid and maintain 225–250°F.
- Do not open the smoker for the first 2 hours. After 2 hours, you can spritz with apple juice or apple cider vinegar every 45 minutes if desired (this promotes bark development by adding sugars and moisture that quickly evaporate).
- At the 3-hour mark, the ribs should have a dark reddish-brown bark and the internal temperature should be around 160–170°F.
Phase 2: Wrap (2 Hours)
- Lay out two sheets of heavy-duty aluminum foil (or one large sheet of pink butcher paper).
- Place 2 tablespoons of butter, a drizzle of honey, and a splash of apple juice on the foil.
- Place the ribs meat-side down on top of the liquid.
- Wrap tightly, crimping the edges to seal.
- Return to the smoker, seam-side up, for 2 hours at 225–250°F.
- No additional wood is needed — smoke absorption is complete.
Phase 3: Glaze (1 Hour)
- Carefully unwrap the ribs (save the liquid for basting or discard).
- Place ribs bone-side down on the grate.
- Apply a thin layer of your preferred BBQ sauce with a silicone brush.
- Cook for 20 minutes, then apply a second coat of sauce.
- Cook for another 20 minutes, then apply a final coat.
- Cook for 20 more minutes. The sauce should be tacky and caramelized, not wet.
- Check internal temperature — target 195–205°F between the bones.
- Perform the bend test and toothpick test.
Rest and Serve
Let the ribs rest for 10–15 minutes before cutting. This allows the juices to redistribute — the same principle as resting a steak, just scaled up. Cut between the bones with a sharp knife. Serve with extra sauce on the side.
The Bottom Line
The 3-2-1 method works because it sequences three distinct physical processes in the correct order: bark formation and smoke absorption first (while the surface is dry), collagen-to-gelatin conversion second (in a moist braise), and glaze caramelization third (back in dry heat). Each phase creates conditions that are impossible in the others.
Once you understand the science behind each number, you can adapt the timing to your smoker, your ribs, and your preferences — and produce competition-quality ribs every single time.
Frequently Asked Questions
What does 3-2-1 mean for ribs?
The 3-2-1 method is a timing framework for smoking spare ribs at 225–250°F: 3 hours of direct smoke exposure for bark and flavor, 2 hours wrapped in foil for collagen-to-gelatin conversion and tenderness, and 1 hour unwrapped with sauce for glaze caramelization. Total cook time is 6 hours.
Does the 3-2-1 method work for baby back ribs?
Baby back ribs are leaner and thinner than spare ribs, so the full 3-2-1 timing will overcook them. Use the 2-2-1 method instead: 2 hours smoke, 2 hours wrapped, 1 hour sauced. Total cook time is 5 hours. Some very small racks may need even less time.
Should I use foil or butcher paper to wrap ribs?
Foil creates a fully sealed braise that produces maximum tenderness but softens the bark. Butcher paper is semi-permeable — it slows moisture loss while allowing some evaporation, producing firmer bark but slightly less tender meat. For spare ribs, foil is traditional. For baby backs, butcher paper preserves better texture.
What temperature should ribs be when done?
Target 195–205°F measured between the bones in the thickest section. At this temperature, collagen has fully converted to gelatin and fat has rendered completely. The meat should pull cleanly from the bone with a gentle tug but not fall off on its own — that indicates overcooking.
Why are my 3-2-1 ribs mushy?
Mushy ribs are overcooked — the collagen has converted too far and the muscle fibers have expelled too much moisture. This usually happens when the smoker runs hotter than 250°F (accelerating the timeline) or the wrap phase runs too long. Try reducing Phase 2 to 1.5 hours, or switching from foil to butcher paper for less aggressive braising.
Do I need to remove the membrane from ribs?
Yes. The peritoneum membrane on the bone side of spare ribs is a tough, rubbery sheet that does not render during cooking. It blocks smoke and rub penetration and creates a chewy, unpleasant texture. Remove it before cooking by sliding a butter knife under one corner and peeling it off with a paper towel for grip.
More Expert Guides
Steak Doneness Temperature Guide: The Science of Every Level from Rare to Well Done
Every degree matters. This science-backed guide covers the exact internal temperatures for every steak doneness level, why each temperature produces a different texture, and how to nail your target every time.
14 min readDirect vs Indirect Heat Grilling: The Science of Two-Zone Cooking
Direct heat sears. Indirect heat roasts. Understanding the physics of each — and when to combine them — is the foundation of every great grilling technique.
14 min readResting Meat After Cooking: The Science of Why It Makes Every Steak Juicier
Resting meat after cooking is not optional — it is physics. Here is exactly what happens inside the steak during those crucial minutes and how long to rest every cut.